7.1Authentication >> Administrative Users

Administrative Users refers to users who have the right (depending on their authorization level) to configure the mGuard (root and administrator authorization levels) or to use it (user authorization level).
|
|
To log into the corresponding authorization level, the user must enter the password assigned to the relevant authorization level (root, admin or user). 
|
|
|
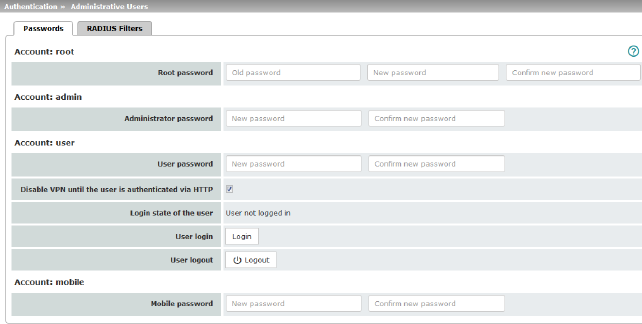
Account: root |
Root password |
Grants full rights to all parameters of the mGuard. Background: only this authorization level allows unlimited access to the mGuard file system. User name (cannot be modified): root Default root password: root •To change the root password, enter the old password in the Old password field, then the new password in the next two fields. |
|
Account: admin |
Administrator password |
Grants the rights required for the configuration options accessed via the web-based administrator interface. User name (cannot be modified): admin Default password: mGuard |
|
Account: user |
User password |
There is no default user password. To set one, enter the desired password in both input fields. |
|
|
Disable VPN until the user is authenticated via HTTP |
If a user password has been specified and activated, the user must always enter this password after an mGuard restart in order to enable mGuard VPN connections when attempting to access any HTTP URL. The function is deactivated by default. When the function is activated, VPN connections can only be used once a user has logged into the mGuard via HTTP. As long as authentication is required, all HTTP connections are redirected to the mGuard. Changes to this option only take effect after the next restart. To use this option, specify the user password in the corresponding input field. |
|
|
Login state of the user |
Displays whether the user is logged on or off. |
|
|
User login |
To log in the user, click on the Login button. |
|
|
User logout |
To log out the user, click on the Logout button. |
|
Account: mobile (Only TC MGUARD RS4000/RS2000 3G, TC MGUARD RS4000/RS2000 4G) |
Mobile password |
There is no default mobile password. To set one, enter the desired password in both input fields. |

Group names can be created here for administrative users whose password is checked using a RADIUS server when accessing the mGuard. Each of these groups can be assigned an administrative role.

|
(This menu item is not included in the scope of functions for TC MGUARD RS2000 3G, TC MGUARD RS2000 4G, FL MGUARD RS2005 or FL MGUARD RS2000.) |
The mGuard only checks passwords using RADIUS servers if you have activated RADIUS authentication: –For shell access, see menu: Management >> System Settings >> Shell Access –For web access, see menu: Management >> Web Settings >> Access The RADIUS filters are searched consecutively. When the first match is found, access is granted with the corresponding role (admin, netadmin, audit). |
|
|
|
After a RADIUS server has checked and accepted a user's password, it sends the mGuard a list of filter IDs in its response. These filter IDs are assigned to the user in a server database. They are used by the mGuard for assigning the group and therefore the authorization level as “admin”, “netadmin” or “audit”. If authentication is successful, this is noted as part of the mGuard's logging process. Other user actions are logged here using the original name of the user. The log messages are forwarded to a remote server, provided a remote server has been approved by the mGuard. The following actions are recorded: –Login –Logout –Start of a firmware update –Changes to the configuration –Password changes for one of the predefined users (root, admin, netadmin, audit, mobile, and user). |
|
|
RADIUS Filters for Administrative Access |
Group/Filter ID |
The group name may only be used once. Two lines must not have the same value. Responses from the RADIUS server with notification of successful authentication must have this group name in their filter ID attribute. Up to 50 characters are allowed (printable UTF-8 characters only) without spaces. |
|
Authorized for access as |
Each group is assigned an administrative role. admin: administrator netadmin: administrator for the network audit: auditor/tester The netadmin and audit authorization levels relate to access rights with the mGuard device manager (FL MGUARD DM). |
|
7.2Authentication >> Firewall Users
To prevent private surfing on the Internet, for example, every outgoing connection is blocked under Network Security >> Packet Filter >> DMZ. VPN is not affected by this.
Under Network Security >> User Firewall, different firewall rules can be defined for certain users, e.g., all outgoing connections are permitted. This user firewall rule takes effect as soon as the relevant firewall user(s) (to whom this user firewall rule applies) has (or have) logged in, see "Network Security >> User Firewall" on page 290.
|
This menu is not available on the FL MGUARD RS2000, TC MGUARD RS2000 3G, TC MGUARD RS2000 4G, and FL MGUARD RS2005. Concurrent administrative access via X.509 authentication and via login to the mGuard user firewall is not possible with the “Safari” web browser. |
|
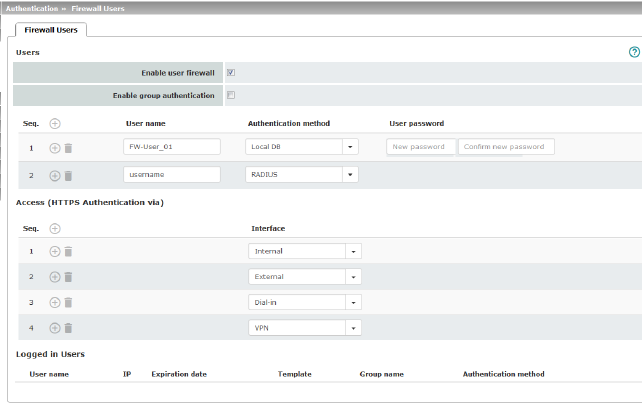
Users |
Lists the firewall users by their assigned user identifier. Also specifies the authentication method. |
|
|
|
Enable user firewall |
Under the Network Security >> User Firewall menu item, firewall rules can be defined and assigned to specific firewall users. When the user firewall is activated, the firewall rules assigned to the listed users are applied as soon as the corresponding user logs in. |
|
|
When activated, the mGuard forwards login requests for unknown users to the RADIUS server. If successful, the response from the RADIUS server will contain a group name. The mGuard then enables user firewall templates containing this group name as the template user. The RADIUS server must be configured to deliver this group name in the “Access Accept” packet as a “Filter-ID=<group name>” attribute. |
|
|
|
User name |
Name specified by the user during login. |
|
|
Local DB: when Local DB is selected, the password assigned to the user, and that the user must enter on login along with their User name, must be entered in the User password column. RADIUS: if RADIUS is selected, the user password can be stored on the RADIUS server. 
|
|
|
|
(Only if Local DB is selected as the authentication method.) |
Assigned user password. |
|
Access (HTTPS Authentication via) |
Specifies which mGuard interfaces can be used by firewall users to log into the mGuard. 
|
|
|
|
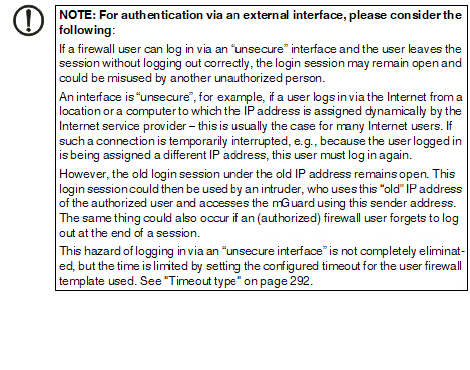
Interface |
Internal / External / External 2 / DMZ1 / VPN / Dial-in2 Specifies which mGuard interfaces can be used by firewall users to log into the mGuard. For the interface selected, web access via HTTPS must be enabled: “Management >> Web Settings” menu, Access tab (see "Access" on page 73) 
. |
|
Logged in Users |
When the user firewall is activated, the status of logged in firewall users is displayed here. Selected users can be logged off by clicking on the |
|
|
1DMZ is only for devices with a DMZ interface. 2External 2 and Dial-in are only for devices with a serial interface (see "Network >> Interfaces" on page 131). |

A RADIUS server is a central authentication server used by devices and services to check user passwords. The password is not known to these devices and services. Only one or a number of RADIUS servers know the password.
The RADIUS server also provides the device or service that a user wishes to access with further information about the user, e.g., the group to which the user belongs. In this way, all user settings can be managed centrally.
In order to activate RADIUS authentication, Yes must be set under Authentication >> Firewall Users (Enable group authentication sub-item) and RADIUS selected as the Authentication method.
A list of RADIUS servers used by the mGuard is generated under Authentication >> RADIUS Servers. This list is also used when RADIUS authentication is activated for administrative access (SSH/HTTPS).
When RADIUS authentication is active, the login attempt of a non-predefined user (not: root, admin, netadmin, audit or user) is forwarded to all the RADIUS servers listed here. The first response received by the mGuard from one of the RADIUS servers determines whether or not the authentication attempt is successful.
|
If you change passwords or make changes to the authentication process, you should then restart the mGuard to securely end existing sessions with certificates or passwords that are no longer valid. |
|
RADIUS Servers (This menu item is not included in the scope of functions for TC MGUARD RS2000 3G, TC MGUARD RS2000 4G, FL MGUARD RS2005 or FL MGUARD RS2000.) |
RADIUS timeout |
Specifies the time (in seconds) the mGuard waits for a response from the RADIUS server. Default: 3 seconds. |
|
RADIUS retries |
Specifies how many times requests to the RADIUS server are repeated after the RADIUS timeout time has elapsed. Default: 3. |
|
|
|
RADIUS NAS identifier |
A NAS ID (NAS identifier) is sent with every RADIUS request, except when the field remains empty. All common characters on the keyboard (except for umlauts) can be used as the NAS ID. The NAS ID is a RADIUS attribute that can be used by the client to be identified by the RADIUS server. The NAS ID can be used instead of an IP address to identify the client. It must be unique within the range of the RADIUS server. |
|
|
Server |
Name of the RADIUS server or its IP address. 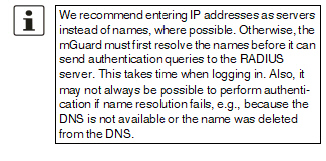
|
|
|
The RADIUS server's request is, where possible, carried out via a VPN tunnel. When the function is activated, communication with the server is always via an encrypted VPN tunnel if a suitable one is available. 
|
|
|
|
When the Via VPN function is activated, the mGuard supports queries from a RADIUS server through its VPN connection. This happens automatically whenever the RADIUS server belongs to the remote network of a configured VPN tunnel and the mGuard has an internal IP address belonging to the local network of the same VPN tunnel. This makes the authentication query dependent on the availability of a VPN tunnel. 
|
|
|
|
Port |
The port number used by the RADIUS server. |
|
|
Secret |
RADIUS server password (secret) This password must be the same as on the mGuard. The mGuard uses this password to exchange messages with the RADIUS server and to encrypt the user password. The RADIUS server password is not transmitted in the network. 
Administrative access to the mGuard should remain possible while the RADIUS server password is being changed. Proceed as follows to ensure this: •Set up the RADIUS server for the mGuard a second time with a new password. •Also set this new password on the RADIUS server. •On the mGuard, delete the line containing the old password. |
7.4Authentication >> Certificates
Authentication is a fundamental element of secure communication. The X.509 authentication method relies on certificates to ensure that the “correct” partners communicate with each other and that no “incorrect” partner is involved in communication. An “incorrect” communication partner is one who falsely identifies themselves as someone they are not (see glossary under "X.509 certificate" on page 451).
Certificate
A certificate is used as proof of the identity of the certificate owner. The relevant authorizing body in this case is the CA (certificate authority). The digital signature on the certificate is provided by the CA. By providing this signature, the CA confirms that the authorized certificate owner possesses a private key that corresponds to the public key in the certificate.
The name of the certificate issuer appears under Issuer on the certificate, while the name of the certificate owner appears under Subject.
Self-signed certificates
A self-signed certificate is one that is signed by the certificate owner and not by a CA. In self-signed certificates, the name of the certificate owner appears under both Issuer and Subject.
Self-signed certificates are used if communication partners want to or must use the X.509 authentication method without having or using an official certificate. This type of authentication should only be used between communication partners that know and trust each other. Otherwise, from a security point of view, such certificates are as worthless as, for example, a home-made passport without the official stamp.
Certificates are shown to all communication partners (users or machines) during the connection process, providing the X.509 authentication method is used. In terms of the mGuard, this could apply to the following applications:
–Authentication of communication partners when establishing VPN connections using IPsec (see "IPsec VPN >> Connections" on page 320, "Authentication" on page 342).
–Authentication of communication partners when establishing VPN connections using OpenVPN (see "OpenVPN Client >> Connections" on page 363, "Authentication" on page 370).
–Management of the mGuard via SSH (shell access) (see "Management >> System Settings >> Host" on page 47, "Shell Access" on page 56).
–Management of the mGuard via HTTPS (see "Management >> Web Settings" on page 72, "Access" on page 73).
Certificate, machine certificate
Certificates can be used to identify (authenticate) oneself to others. The certificate used by the mGuard to identify itself to others shall be referred to as the “machine certificate” here, in line with Microsoft Windows terminology.
A “certificate”, “certificate specific to an individual” or “user certificate showing a person” is one used by operators to authenticate themselves to peers (e.g., an operator attempting to access the mGuard via HTTPS and a web browser for the purpose of remote configuration). A certificate specific to an individual can also be saved on a chip card and then inserted by its owner in the card reader of their computer when prompted by a web browser during connection establishment, for example.
Remote certificate
A certificate is thus used by its owner (person or machine) as a form of ID in order to verify that they really are the individual they identify themselves as. As there are at least two communication partners, the process takes place alternately: partner A shows their certificate to their peer, partner B; partner B then shows their certificate to their peer, partner A.
Provision is made for the following so that A can accept the certificate shown by B, i.e., the certificate of their peer (thus allowing communication with B): A has previously received a copy of the certificate from B (e.g., by data carrier or e-mail) which B will use to identify itself to A. A can then verify that the certificate shown by B actually belongs to B by comparing it with this copy. With regard to the mGuard interface, the certificate copy given here by partner B to A is an example of a remote certificate.
For reciprocal authentication to take place, both partners must thus provide the other with a copy of their certificate in advance in order to identify themselves. A installs the copy of the certificate from B as its remote certificate. B then installs the copy of the certificate from A as its remote certificate.
Never provide the PKCS#12 file (file name extension: *.p12) as a copy of the certificate to the peer in order to use X.509 authentication for communication at a later time. The PKCS#12 file also contains the private key that must be kept secret and must not be given to a third party (see "Creation of certificates" on page 244).
To create a copy of a machine certificate imported in the mGuard, proceed as follows:
•On the “Machine Certificates” tab, click on the Current Certificate File button next to the Download Certificate row for the relevant machine certificate (see "Machine Certificates" on page 250).
CA certificates
The certificate shown by a peer can also be checked by the mGuard in a different way, i.e., not by consulting the locally installed remote certificate on the mGuard. To check the authenticity of possible peers in accordance with X.509, the method described below of consulting CA certificates can be used instead or as an additional measure, depending on the application.
CA certificates provide a way of checking whether the certificate shown by the peer is really signed by the CA specified in the peer's certificate.
A CA certificate is available as a file from the relevant CA (file name extension: *.cer, *.pem or *.crt). For example, this file may be available to download from the website of the relevant CA.
The mGuard can then check if the certificate shown by the peer is authentic using the CA certificates loaded on the mGuard. However, this requires all CA certificates to be made available to the mGuard in order to form a chain with the certificate shown by the peer. In addition to the CA certificate from the CA whose signature appears on the certificate shown by the peer to be checked, this also includes the CA certificate of the superordinate CA, and so forth, up to the root certificate (see glossary under "CA certificate" on page 445).
Authentication using CA certificates enables the number of possible peers to be extended without any increased management effort because it is not compulsory to install a remote certificate for each possible peer.
To create a certificate, a private key and the corresponding public key are required. Programs are available so that any user can create these keys. Similarly, a corresponding certificate with the corresponding public key can also be created, resulting in a self-signed certificate. (Additional information about self-creation can be downloaded from phoenixcontact.net/products. It is available in the download area in an application note entitled “How to obtain X.509 certificates”.)
A corresponding certificate signed by a CA must be requested from the CA.
In order for the private key to be imported into the mGuard with the corresponding certificate, these components must be packed into a PKCS#12 file (file name extension: *.p12).
Authentication methods
The mGuard uses two methods of X.509 authentication that are fundamentally different.
–The authentication of a peer is carried out based on the certificate and remote certificate. In this case, the remote certificate that is to be consulted must be specified for each individual connection, e.g., for VPN connections.
–The mGuard consults the CA certificates provided to check whether the certificate shown by the peer is authentic. This requires all CA certificates to be made available to the mGuard in order to form a chain with the certificate shown by the peer through to the root certificate.
“Available” means that the relevant CA certificates must be installed on the mGuard (see "CA Certificates" on page 252) and must also be referenced during the configuration of the relevant application (SSH, HTTPS, and VPN).
Whether both methods are used alternatively or in combination varies depending on the application (VPN, SSH, and HTTPS).
|
If you change passwords or make changes to the authentication process, you should then restart the mGuard to securely end existing sessions with certificates or passwords that are no longer valid. |
Restrictions using the “Safari” web browser
|
Please note that during administrative access to the mGuard via an X.509 certificate using the “Safari” web browser all sub-CA certificates must be installed in the web browser's Trust Store. |
Authentication for SSH
|
The peer shows the following: |
Certificate (specific to individual), signed by CA |
Certificate (specific to individual), self-signed |
|
The mGuard authenticates the peer using: |
|
|
|
|
All CA certificates that form the chain to the root CA certificate together with the certificate shown by the peer PLUS (if required) Remote certificates, if used as a filter1 |
Remote certificate |
|
1(See "Management >> System Settings" on page 47, "Shell Access" on page 56) |
Authentication for HTTPS
|
The peer shows the following: |
Certificate (specific to individual), signed by CA1 |
Certificate (specific to individual), self-signed |
|
The mGuard authenticates the peer using: |
|
|
|
|
All CA certificates that form the chain to the root CA certificate together with the certificate shown by the peer PLUS (if required) Remote certificates, if used as a filter2 |
Remote certificate
|
|
1The peer can additionally provide sub-CA certificates. In this case, the mGuard can form the set union for creating the chain from the CA certificates provided and the self-configured CA certificates. The corresponding root CA certificate must always be available on the mGuard. 2(See "Management >> Web Settings" on page 72, "Access" on page 73) |
Authentication for VPN
|
The peer shows the following: |
Machine certificate, signed by CA |
Machine certificate, self-signed |
|
The mGuard authenticates the peer using: |
|
|
|
|
Remote certificate Or all CA certificates that form the chain to the root CA certificate together with the certificate shown by the peer |
Remote certificate |
|
NOTE: It is not sufficient to simply install the certificates to be used on the mGuard under Authentication >> Certificates. In addition, the certificate from the pool of certificates imported into the mGuard that is to be used must be referenced in the relevant applications (VPN, SSH, HTTPS). |
|
The remote certificate for authentication of a VPN connection (or the tunnels of a VPN connection) is installed in the IPsec VPN >> Connections menu. |

|
Certificate Settings |
The settings made here relate to all certificates and certificate chains that are to be checked by the mGuard. This generally excludes the following: –Self-signed certificates from peers –All remote certificates for VPN |
|
|
|
Check the validity period of certificates and CRLs |
Always The validity period is always observed. No The validity period specified in certificates and CRLs is ignored by the mGuard. Wait for synchronization of the system time The validity period specified in certificates and CRLs is only observed by the mGuard if the current date and time are known to the mGuard: –By means of the built-in clock (for TC MGUARD RS4000/RS2000 3G, TC MGUARD RS4000/RS2000 4G, FL MGUARD RS2005, FL MGUARD RS4000/RS2000, FL MGUARD GT/GT, mGuard Centerport (Innominate), FL MGUARD CENTERPORT, FL MGUARD RS, mGuard delta (Innominate), FL MGUARD SMART2) or –By synchronizing the system clock (see "Time and Date" on page 49) Until this point, all certificates to be checked are considered invalid for security reasons. |
|
|
Enable CRL checking |
When CRL checking is enabled, the mGuard consults the CRL (certificate revocation list) and checks whether or not the certificates that are available to the mGuard are blocked. CRLs are issued by the CAs and contain the serial numbers of blocked certificates, e.g., certificates that have been reported stolen. On the CRL tab (see "CRL" on page 256), specify the origin of the revocation lists for the mGuard. 


|
|
|
CRL download interval |
If CRL checking is enabled (see above), select the time period in which the revocation lists should be downloaded and applied. On the CRL tab (see "CRL" on page 256), specify the origin of the revocation lists for the mGuard. If CRL checking is enabled, but CRL download is set to Never, the CRL must be manually loaded on the mGuard so that CRL checking can be performed. |
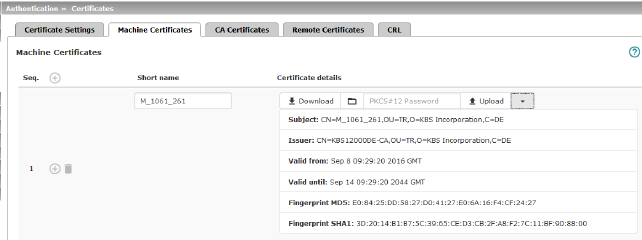
The mGuard authenticates itself to the peer using a machine certificate loaded on the mGuard. The machine certificate acts as an ID card for the mGuard, which it shows to the relevant peer.
For a more detailed explanation, see "Authentication >> Certificates" on page 243.
By importing a PKCS#12 file, the mGuard is provided with a private key and the corresponding machine certificate. Multiple PKCS#12 files can be loaded on the mGuard, enabling the mGuard to show the desired self-signed or CA-signed machine certificate to the peer for various connections.
In order to use the machine certificate installed at this point, it must be referenced additionally during the configuration of applications (SSH, VPN) so that it can be used for the relevant connection or remote access type.
Example of imported machine certificates (see above).
|
Authentication >> Certificates >> Machine Certificates |
|
|---|---|
|
Shows the currently imported X.509 certificates that the mGuard uses to authenticate itself to peers, e.g., other VPN gateways. |
|
To import a (new) certificate, proceed as follows:
Importing a new machine certificate
Requirement:
The PKCS#12 file (file name extension: *.p12 or *.pfx) is saved on the connected computer.
Proceed as follows:
•Click on the  No file selected icon to select the file.
•In the Password field, enter the password used to protect the private key of the PKCS#12 file.
•Click on the  Upload icon.
Once imported, you can view the details of the certificate by clicking on the  Details button.
•Save the imported certificate by clicking on the  Save icon.
Short name
When importing a machine certificate, the CN attribute from the certificate subject field is suggested as the short name here (providing the Short name field is empty at this point). This name can be adopted or another name can be chosen.
•A name must be assigned, whether it is the suggested one or another. Names must be unique and must not be assigned more than once.
Using the short name
During the configuration of:
–SSH (Management >> System Settings, Shell Access menu)
–HTTPS (Management >> Web Settings, Access menu)
–VPN connections (IPsec VPN >> Connections menu)
the certificates imported on the mGuard are provided in a selection list.
The certificates are displayed under the short name specified for each individual certificate on this page.
For this reason, name assignment is mandatory.
Creating and downloading a certificate copy
You can create and download a copy of the imported machine certificate (e.g., for the peer in order to authenticate the mGuard). This copy does not contain the private key and therefore does not pose a risk.
To do this, proceed as follows:
•Click on the  Download icon in the row for the relevant machine certificate.
•Follow the instructions in the dialog boxes that are displayed.
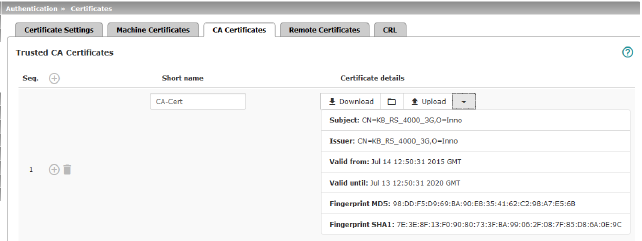
CA certificates are certificates issued by a certification authority (CA). CA certificates are used to check whether the certificates shown by peers are authentic.
The checking process is as follows: the certificate issuer (CA) is specified as the issuer in the certificate transmitted by the peer. These details can be verified using the local CA certificate from the same issuer. For a more detailed explanation, see "Authentication >> Certificates" on page 243.
Example of imported CA certificates (see above).
|
Authentication >> Certificates >> CA Certificates |
|
|---|---|
|
Trusted CA Certificates |
Displays the current imported CA certificates. |
To import a (new) certificate, proceed as follows:
Importing a CA certificate
The file (file name extension: *.cer, *.pem or *.crt) is saved on the connected computer.
Proceed as follows:
•Click on the  No file selected icon to select the file.
•Click on the  Upload icon.
Once imported, you can view the details of the certificate by clicking on the  Details button.
•Save the imported certificate by clicking on the  Save icon.
Short name
When importing a CA certificate, the CN attribute from the certificate subject field is suggested as the short name here (providing the Short name field is empty at this point). This name can be adopted or another name can be chosen.
•You must assign a name. The name must be unique.
Using the short name
During the configuration of:
–SSH (Management >> System Settings, Shell Access menu)
–HTTPS (Management >> Web Settings, Access menu)
–VPN connections (IPsec VPN >> Connections menu)
the certificates imported on the mGuard are provided in a selection list. The certificates are displayed under the short name specified for each certificate in this selection list. Name assignment is mandatory.
Creating and downloading a certificate copy
A copy can be created from the imported CA certificate and downloaded.
To do this, proceed as follows:
•Click on the  Download icon in the row for the relevant CA certificate.
•Follow the instructions in the dialog boxes that are displayed.
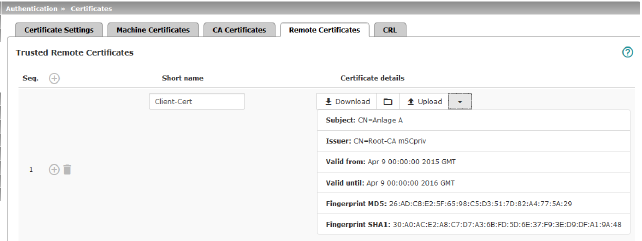
A remote certificate is a copy of the certificate that is used by a peer to authenticate itself to the mGuard.
Remote certificates are files (file name extension: *.cer, *.pem or *.crt) received from the operators of possible peers by trustworthy means. You load these files on the mGuard so that reciprocal authentication can take place. The remote certificates of several possible peers can be loaded.
The remote certificate for authentication of a VPN connection (or the tunnels of a VPN connection) is installed in the IPsec VPN >> Connections menu.
For a more detailed explanation, see "Authentication >> Certificates" on page 243.
Example of imported remote certificates (see above)
|
Authentication >> Certificates >> Remote Certificates |
|
|---|---|
|
Trusted Remote Certificates |
Displays the current imported remote certificates. |
Importing a new certificate
Requirement:
The file (file name extension: *.cer, *.pem or *.crt) is saved on the connected computer.
Proceed as follows:
•Click on the  No file selected icon to select the file.
•Click on the  Upload icon.
Once imported, you can view the details of the certificate by clicking on the  Details button.
•Save the imported certificate by clicking on the  Save icon.
When importing a remote certificate, the CN attribute from the certificate subject field is suggested as the short name here (providing the Short name field is empty at this point). This name can be adopted or another name can be chosen.
•A name must be assigned, whether it is the suggested one or another. Names must be unique and must not be assigned more than once.
Using the short name
During the configuration of:
–SSH (Management >> System Settings, Shell Access menu)
–HTTPS (Management >> Web Settings, Access menu)
the certificates imported on the mGuard are provided in a selection list. The certificates are displayed under the short name specified for each certificate in this selection list. Name assignment is mandatory.
Creating and downloading a certificate copy
A copy can be created from the imported remote certificate and downloaded.
To do this, proceed as follows:
•Click on the  Download icon in the row for the relevant remote certificate.
•Follow the instructions in the dialog boxes that are displayed.

|
Authentication >> Certificates >> CRL |
||
|---|---|---|
|
Certificate Revocation List (CRL) |
CRL stands for certificate revocation list. The CRL is a list containing serial numbers of blocked certificates. This page is used for the configuration of sites from which the mGuard should download CRLs in order to use them. Certificates are only checked for revocations if the Enable CRL checking function has been activated (see "Certificate Settings" on page 248). A CRL with the same issuer name must be present for each issuer name specified in the certificates to be checked. If such a CRL is not present and CRL checking is enabled, the certificate is considered invalid. 
|
|
|
|
URL |
Specify the URL of the CA where CRL downloads are obtained if the CRL should be downloaded on a regular basis, as defined under CRL download interval on the Certificate Settings tab (see "Certificate Settings" on page 248). |
|
|
Via VPN |
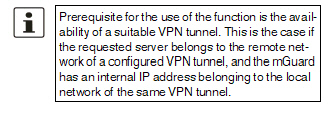
The CRL download server's (URL) request is, where possible, carried out via a VPN tunnel. When the function is activated, communication with the server is always via an encrypted VPN tunnel if a suitable one is available. 
|
|
|
Next update |
Information read directly from the CRL by the mGuard: Time and date when the CA will next issue a new CRL. This information is not influenced or considered by the CRL download interval. |
|
|
CRL issuer |
Information read directly from the CRL by the mGuard: Shows the issuer of the relevant CRL. |
|
|
Action: upload CRL file |
If the CRL is available as a file, it can also be imported on the mGuard manually. •Click on the 
•Then click on the •Click on the 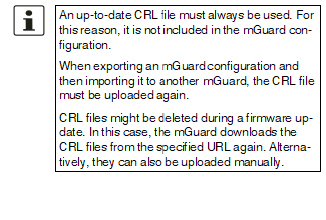
|