7mdm
client – Management tasks
7.1Upload configurations to mGuard devices

NOTE: Restrictions
for FL MGUARD 1000 family devices
The
new devices of the FL MGUARD 1000 family (FL MGUARD 1102/1105)
configurable in mdm 1.12.x support fewer functions and variables
than the devices of the FL/TC MGUARD 2000/4000 family (MGUARD2
platform).
Therefore,
some of the functions described below are not available on these
devices. |
7.1.1Upload
methods
You
have the following options to initiate an upload of the configuration
to the devices:
–Open
the menu Upload in the main menu (Chapter 5.2.1)
and select which devices should be uploaded (All,
Selected or Changed,
i.e. all devices in mdm, corresponding to mGuard s with a configuration status of
out-of-date).
–Select
the entry Upload in the context menu
(right-click on the device table). This will schedule all currently selected
devices in the device table for upload.
–Click
on the  icon in the tool bar to initiate
an upload for the currently selected devices in the device table.
icon in the tool bar to initiate
an upload for the currently selected devices in the device table.
mdm
offers several methods to upload the configuration files to the mGuards. After initiating the upload,
please specify which upload method you prefer.
Auto
Depending
on whether or not Accessible via in
General settings is set, mdm will either
perform
–an
SSH push upload (see “Upload
via SSH” ) or
–an
export of the configuration to the file system (see “Prepare pull configuration” )
or
–an
upload via the REST API of FL MGUARD 1000 devices.
Upload
via SSH
mdm tries to upload all scheduled devices
by using an SSH push upload.
The mdm server accesses the mGuards using the SSH protocol. Subsequently
the configuration file is copied to the device and put into operation.
Any failures during the upload process are shown in the log window. To
use this method the following requirements have to be met:
–In
the General Settings of the Device
properties dialog an IP
address or a hostname has to be set for the field Accessible
via. The SSH port number can be set optionally.
–The
mGuard has to be accessible
from the mdm server using the Accessible via
address, i.e. a firewall must not block the traffic and a NAT device
in the communication path has to be configured appropriately to allow
the communication between the mdm server and the mGuard.
–In
case the mGuard is
accessed on the external interface, the SSH remote access has to be enabled
on the mGuard.
–The
passwords to access the device have to be set correctly. For uploading
the device configuration to the mGuard,
mdm logs in as user admin. In case
of a password change there are 2 passwords involved: the old password,
which is used to access the device and the new password, which will be
set after logging in. Therefore mdm automatically keeps track of the active
password to be used to access the device and does not
use the password configured in the Device
properties dialog for
this purpose. If you would like to manually change the active password
you can use the option Set Current Device Credentials
in the context menu of the device table.

If a device is not accessible, mdm
will retry the connection after a waiting time. As soon as the
maximum count of retries is reached mdm will stop trying to upload
the configuration and will show an error in the log. |

If a configuration change causes the
mGuard to
reboot (e.g. when switching from stealth to router mode), mdm
is not immediately informed whether the configuration has been
successfully applied. It will therefore reaccess the device after
a waiting time. Adapt the Accessible
via, SSH port and Web configuration port settings
after the initial upload if necessary (see “Accessible via” on page 91).
Alternatively the configuration state can be set manually with
the option Set Upload State in the
context menu of the device overview table. |

If you change the password in the
Device properties dialog and
a subsequent upload of the device configuration fails, it may
happen that the password change was applied on the mGuard but mdm was not able
to keep track of the successful change. In this case you have
to manually set the active password in mdm using the option Set Current Device Credentials in
the context menu of the device overview table, otherwise mdm will
not be able to log in for the next upload. |

Due to this potential issue it is
recommend to apply (upload) password changes separately from
extensive configuration changes. |
Prepare
pull configuration
The configuration of all scheduled devices
will be exported to the file system.

The export directory can be configured
in the preferences file of the server (see Chapter 10.1). |

The filename for each configuration
file is shown in the General settings of
the Device properties dialog and in the device table. |

In case the files cannot be written
to the file system (no permission, disk capacity exceeded, export
directory not existent, etc.), mdm displays an error in the log
and the upload status will be set to error. |
The mGuards
are able to pull configuration files from an HTTPS server. mGuards running firmware version 5.0
or later can additionally pull license files.
To use the configuration pull feature, please
refer to the section Manual configuration upload above
for a description how to export configuration and license files. Additionally
the following requirements have to be met:
–An
HTTPS configuration pull server has to be configured (see Chapter 3.2).
–The
configuration pull has to be configured on the mGuards
(please refer to the Reference Manual mGuard Firmware).
Additionally the mGuards
have to be configured with the 2 following commands to pull their configuration
according to the mdm file name convention:
gaiconfig --set GAI_PULL_HTTPS_DIR
<your_directory>
gaiconfig --set GAI_PULL_HTTPS_FILE <identifier>.atv
–In
case that the mdm server and the configuration server are installed on
different machines you have to make sure that the mdm export files are
synced to the file system of the configuration server.
–If
mdm is installed manually, additional steps are necessary
if you would like to get a feedback whether or not the configuration pull
was successful.
–mdm
is able to receive Syslog messages on port UDP 7514 (default) in
order to detect the configuration status of a device if mdm is configured
as Syslog server in the configuration server settings.

The pull request contains information
about the current configuraton status of the mGuard.
This information will be sent as Syslog message from the configuration
server to mdm. The port on which mdm listens for Syslog messages
can be configured in the preferences file of the mdm server (see
Chapter 10.1). |
Profile
encryption
Configuration profiles exported by the mdm
server can optionally be encrypted with a device-specific key. The mdm
server downloads the key from the license server. Only the public (encryption)
key is known to Phoenix Contact ; the corresponding private (decryption)
key is stored within the mGuard
in a special hardware module and cannot be extracted.
Profile encryption can only be used with mGuard hardware that supports this
feature. Firmware version 7.6.0 or later is required.

Since profiles are encrypted with
a device-specific key, only the mGuard for
which the profile has been encrypted can read it. |
Follow these steps to encrypt profiles:
–Obtain
a user name and password to download profile keys from Phoenix Contact support. Configure the mdm
server to use the "username" and "password"; see Chapter 10.1,
nodes license » licenseServer »
reqUsername and license »
licenseServer » reqPassword.
–Select
the devices for which to encrypt profiles in the device overview table.
–Select
the menu entry Get Profile Key in
the context menu to download the keys to the mdm server. The serial numbers
and flash IDs of the devices are used to identify them to the licsense
server and must therefore be known to mdm; set them if necessary.
–Select
the menu entry Enable/Disable profile encryption in
the context menu to enable profile encryption.
Manage
Profile Keys
The profile keys needed for profile encryption
are listed in the table. New profile keys can be imported. Existing profile
keys can be deleted.
Prepare pull configuration and try ssh
upload
To update devices that are manageable online
via ssh push upload and to update (export) their pull configuration at
once, this method can be used.
The mdm will perform the following tasks:
1.Prepare
the pull configuration as described above (see “Prepare pull configuration” )
for all selected devices.
2.Check,
if an IP address or a hostname has been specified in the field Accessible
via in the General settings of
the Device properties dialog (see
“Device properties dialog” on page 88)
for each of the selected devices.
3.For
those selected devices for which an IP address or a hostname has been
specified, an SSH push upload to the selected device(s) will be performed
(see “Upload
via SSH” ).
Upload
to FL MGUARD 1000
This
method can be used to update FL MGUARD 1000 family devices. A push upload
is performed via HTTPS over the REST API of the devices.
Manual
configuration upload
In case there are only a few devices to be
configured and the devices cannot be accessed by mdm, it is possible to
export the configuration files to the file system and upload them manually
to each device using the Web GUI of the respective device. Each device
is identified by a unique identifier which is automatically assigned
by mdm. This identifier (8-digit hex string with lower case characters)
is used as file name for the export. The convention for the exported configuration
file is: <identifier>.atv. The filename
for each configuration file is shown in the General
settings of the Device properties dialog and in the device table.
To export configuration files the following requirements have to be met:
–An
export directory has to be configured in the preferences file of the mdm
server (see Chapter 10.1).
Please note that it is not possible to export the files locally on the
client side. The files are always exported on the server side to the export
directory configured in the server preferences file.
–The
export directory has to be accessible and writeable from the server.
–There
has to be enough disk space to export the files.
7.1.2Upload
time
The time when upload should be performed.
Times are specified as an ISO date (YYYY-MM-DD where YYYY is the year,
MM is the month of the year between 01 and 12, and DD is the day of the
month between 01 and 31) optionally followed by an ISO time (hh:mm:ss
where hh is the hour according to the 24-hour timekeeping system, mm is
the minute and ss is the second). For example, a quarter past 4 p.m. and
20 seconds on December 22nd, 2010 would be written as 2010-12-22 16:15:20.
Alternatively, click on the  icon
to select the date from a calender.
icon
to select the date from a calender.
If the current time (which is the default
value) or a time in the past is specified, the upload is performed as
soon as possible.
The Upload within … minutes after field is
used to specify an upper bound on the time frame in which mdm will attempt
to perform the upload. If it does not succeed within the specified time,
mdm will perform no more upload attempts and consider the upload failed.
7.1.3Temporary
upload password
If a password is entered into this field,
and a push upload is performed, mdm uses this password when logging into
the mGuard via SSH.
The password is used for all devices. If the field is left empty (default),
mdm uses the known admin password of each device.

The feature is useful if the mGuard does not use the configured
admin password to authenticate the login request, e.g. if the
mGuard uses RADIUS
authentication. |
When a temporary upload password is used,
mdm can use a user name other than admin to log into the mGuard. This user name can be configured
in the Device properties dialog
or the Template properties dialog. Please
open the „Authentication »
Local Users » Temporary Upload User“ node in the navigation
tree.
7.1.4Upload
history
Shows the upload history. The upload history
contains details on the last upload actions and their results for each
device. To review the upload history for a device, please select the mGuard in the device overview
table and open the context menu with a click with the right mouse button.
Select Upload History to open a window with
the upload history.
7.2Manage license vouchers and device
licenses
mdm enables you to centrally manage your license
vouchers and device licenses. The main menu contains two entries: Licenses » Manage Device Licenses and
Licenses » Manage License Vouchers
which are explained in detail in the following sections.
7.2.1Manage
license vouchers
To open the Voucher
Management Window please select Licenses »
Manage License Vouchers from the main menu.
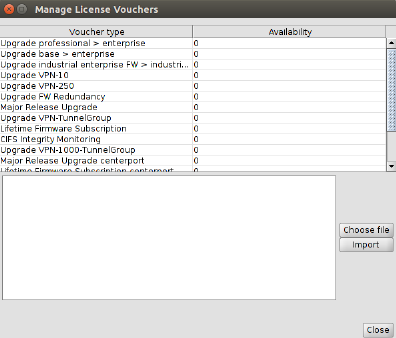
Figure 7-1 The Voucher Management
Window
The window shows the available number of vouchers
per voucher type. To import vouchers either paste the voucher information
into the import field, or select a file that contains the voucher data
and then click on Import. Only CSV is supported
as import format, i.e. each line of the import data has to contain the
following information:
<voucher number>,<voucher key>
7.2.2Request/generate licenses
At least one voucher of the corresponding
type (major release upgrade, VPN etc.) has to be imported into mdm before
requesting a device license. Furthermore the serial number is required
for the license request, i.e. the number has to be supplied in the General Settings of the device. This identification
number may be entered manually or is automatically requested from the
device during the push or pull upload procedure.
To request licenses, select the devices in
the device overview table and either press the  icon
in the tool bar or select Generate License
from the context menu. The generated licenses are subsequently shown
in the License Management Window and
on the Management » Licensing page
in the Device properties dialog and
will be installed on the device with the next upload. The result of the
license request is also shown in the log window.
icon
in the tool bar or select Generate License
from the context menu. The generated licenses are subsequently shown
in the License Management Window and
on the Management » Licensing page
in the Device properties dialog and
will be installed on the device with the next upload. The result of the
license request is also shown in the log window.

mdm has to be able to connect to the
license server in order to generate/request licenses. |
7.2.3Manage
device licenses
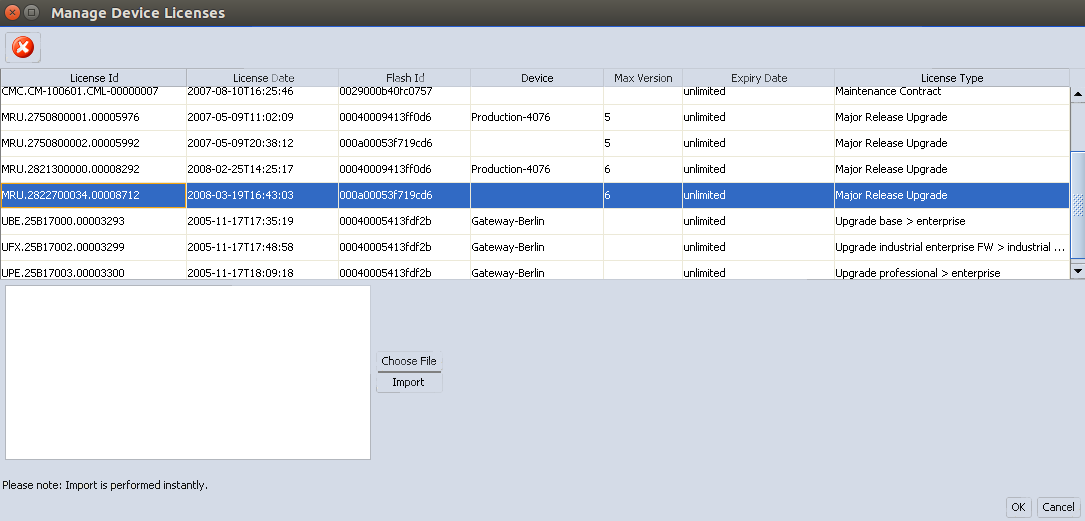
To open the License
Management Window please select Licenses »
Manage Device Licenses from the main menu. All licenses managed
by mdm and their licenses details are shown in the License
Management Window. In addition to license requested/generated by
the procedure described in the previous section, existing licenses can
be imported. To import licenses either type or paste the filenames of
the license files (one filename per line) into the import field and click
on Import subsequently, or click on the Choose File button and select one
or more files in the dialog.
Figure 7-2 The License Management
Window

A double-click on a license (row)
in the table opens the Device properties dialog of the corresponding device (if
any). |

All licenses managed by mdm will be
installed on the devices with every upload. |

The licenses are automatically assigned
to the devices by using the serial number contained in the license,
i.e. without a serial number in the General
settings of the device an assignment of the licenses
is not possible. |
7.2.4Refresh licenses
To refresh all licenses in mdm for a device
you can select the option Refresh Licenses in
the context menu of the device overview table. mdm will contact the license
server and retrieve all licenses that were bought for this device. The
licenses will be installed with the next configuration upload. You can
use this option, if you accidentally deleted licenses in mdm or if you
would like to manage an mGuard that
has already licenses installed that are not yet managed by mdm.
7.3Manage users, roles, and permissions
The permission to log into the mdm client,
and the permission to perform certain operations once logged in, are controlled
through users and roles. A user corresponds to a person logging into
the mdm client. Each user has one or more associated roles, and each role
has an associated set of permissions. The union of all permissions associated
with a user’s roles determine what permissions are granted to a user.

The permissions are granted when a
user logs in, and remain valid until the user logs out. Therefore,
any modifications to the user, role, or permission configuration
have no immediate effect on logged in users. |
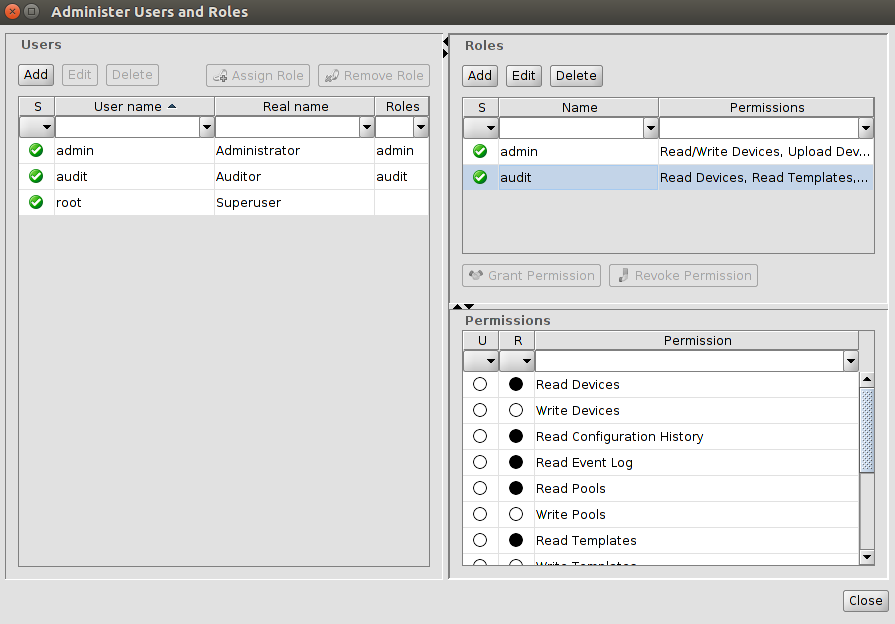
User and role management
Users, roles and permissions are managed in
the Users and Roles Dialog, which is opened through the Extras »
Manage Users and Roles menu entry:
Figure 7-3 The users and roles dialog
The dialog consists of three panels, the Users
Panel, the Roles Panel, and the Permissions Panel.

The Users Panel does not appear if
RADIUS authentication is used; please refer to Chapter 7.3.4 for
more details. The buttons to modify users or roles do not appear
if the user opening the Users and Roles Dialog does not have the
permission to modify users and roles. |
7.3.1Manage users
Users are managed in the Users Panel of the
Users and Roles Dialog.
They can be added with the Add button,
deleted with the Delete button,
and edited with the Edit button
or by double-clicking on the user in the table. The following data must
be specified when adding or editing a user:

Once a Username
has been set, it can not be edited anymore. |
–Username: The username which the user uses
to log into the mdm client. Usernames must be unique.
–Real Name: The Real Name has no technical
effect; its purpose is to make it easier to associate a user with a real
person.
–Password: The user must provide the correct
password to log into the mdm client.
Assigning roles to users
If one or more users in the Users Panel and
one or more roles in the Roles Panel are selected, the roles can be assigned
to the users by clicking the Assign Role
button or removed by clicking the Remove Role
button. All of the selected roles are assigned to or removed from all
of the selected users.
The superuser root
A “superuser” with the user name root always
exists. Although it has no associated roles, it has all permissions (i.e.
it is treated specially by mdm). The superuser cannot be deleted, nor
can permissions be revoked from the superuser.
Initial users
Three users exist in a fresh mdm installation,
root, admin,
and audit. The initial password
of each of these users is identical to the respective user name.
Resetting the root password
If the password for the superuser root is
lost, it is possible to reset it to root with the following psql command
(to be performed while the mdm server is not running):
UPDATE mgnt_system_users SET "password"
= 'WNd6PePC4QrGiz2zeKv6bQ==' WHERE "username" = 'root';
7.3.2Manage
roles
Roles are managed in the Roles Panel of the
Users and Roles Dialog.
They can be added with the Add button,
deleted with the Delete button,
and edited with the Edit button
or by double-clicking on the role in the table. Each role has a name which
must be unique.
Assigning permissions to roles
If one or more roles in the Roles Panel and
one or more permissions in the Permissions Panel are selected, the permissions
can be assigned to the roles by clicking the Grant
Permission button or removed by clicking the Revoke
Permission button. All of the selected permissions are assigned
to or removed from all of the selected roles.
Initial roles
Two roles exist in a fresh mdm installation,
admin, and audit. The admin role has all permissions except modification
of users and roles. The audit role has read permissions, but no modification
permissions.
7.3.3Permissions
The permissions table in the Permissions Panel
of the Users and Roles Dialog lists all available permissions. The permissions
grant the following actions:
Permission |
Granted
Actions |
Read Devices |
View the list of devices, device
configurations, device licenses, and license vouchers. |
Write Devices |
Edit, add, remove, or duplicate
device configurations; add or remove device licenses; add license
vouchers.
If the user has the Read Configuration
History permission in addition to this permission: Reconstruct
devices from device configuration history entries. |
Upload
Device Configuration |
Initiate the upload of configurations
to devices or the export of pull configuration files. |
Read
Configuration History |
View and compare device configuration
history entries.
If the user has the Write Devices
permission in addition to this permission: Reconstruct devices
from device configuration history entries. |
Read Templates |
View the list of templates and
template configurations. |
Write Templates |
Edit, add, remove, or duplicate
template configurations. |
Read Pools |
View the list of pools and pool
configurations. |
Write Pools |
Edit, add, or remove pool configurations. |
Read VPN Groups |
View the list of VPN groups
and VPN group configurations. |
Write VPN Groups |
Edit, add, remove, or duplicate
VPN group configurations. |
Read Users and
Roles |
View users, roles, and permissions. |
Write Users and
Roles |
Manage users, roles, and permissions
(including the permission to set other user’s passwords). |
Read Event Log |
View the persistent event log. |
Minimal permission set
The permissions Read Devices, Read Templates,
Read Pools, and Read VPN Groups form the minimal permission set. These
permissions cannot be revoked from a role.
Filtering the permission table
The columns U and R show how each permission
relates to the currently selected users and roles. They can be used to
filter the permission table.
The following icons can appear in the U column:
 The permission is not granted to any of the selected users.
 The permission is granted to some (but not all) of the selected users.
 The permission is granted to all of the selected users.
Likewise, the same icons are used in the R
column to express if the permission is assigned to none, some, or all
of the selected roles.
7.3.4User authentication
mdm supports two mechanisms to authenticate
users logging into the mdm client, the mdm database and RADIUS.
mdm database authentication
Authentication against the mdm database is
the default mechanism. It uses the user names and passwords stored in
the mdm database and configured in the Users Panel of the Users and Roles
Dialog to authenticate users. Please refer to Chapter 7.3.1
for more details.
RADIUS authentication
Remote Authentication Dial In User Service
(RADIUS) is a network protocol that provides a remote authentication
service. If the mdm server is configured to use RADIUS authentication,
the users stored in the mdm database are ignored. When a user attempts
to log into the mdm client, the mdm server performs a request to one or
more RADIUS servers to authenticate the user. The RADIUS reply must contain
one or more Filter-Id attributes which the mdm server interprets as role
names. If the login attempt is sucessful, the user is assigned to the
roles specified in the Filter-Id attributes.

If RADIUS authentication is used,
mdm does not use the concept of a superuser. The user name root
is not treated specially in any way. |
Please refer to Chapter 10.1 for
more information on how to configure the mdm server to use RADIUS authentication.
7.4Manage X.509 certificates
The functionality of the certificate management
depends on the mGuard release.
Beginning with mGuard firmware
release 5.0 it is possible to:
–manage
multiple machine certificates (prior to release 5.0 only one machine certificate
was supported)
–manage
CA certificates (prior to release 5.0 CA certificates were not supported)
–manage
connection certificates at a central location (prior to 5.0 the connection
certificate was part of the VPN connection only; beginning with 5.0 the
connection certificates can be managed centrally and then be referenced
for SSH or HTTPS authentication)
–manage
CRLs (prior to release 5.0 CA CRLs were not supported)
Exporting Certificates
You can export certificates, e.g. if you would
like to use the machine certificate as connection certificate for a VPN
connection. To export a certificate please navigate to the respective
certificate table (see below for more information) and click on the Export button. You can export the certificate
to a folder of your choice.
7.4.1Machine certificates
You can either import a machine certificate
(PEM or PKCS#12 file), request a certificate from the mdm CA, request
a certificate from any CA supporting the Simple Certificate Enrollment
Protocol (SCEP), or manually enrol certificates.

In a template it is not possible to
request or import a machine certificate. (It is only possible
to import the connection certificate of the peer). |

The file to be imported can be in
PEM format containing the unencrypted private key and the certificate,
or in PKCS#12 format protected by a password (the PKCS#12 file
is only allowed to contain the “machine“ certificate and not an
additional CA certificate). The file type is automatically detected.
When importing a PKCS#12 file, a dialog asking for the password
is displayed.
You can convert a PKCS#12 file
to PEM using the command:
openssl pkcs12 -in inputfile.p12 -nodes -out outputfile.pem
. |

When SCEP is used, the CA server must
be configured to issue certificates immediately. Pending requests
are not supported. |
Requesting a machine certificate
Prior to requesting a certificate make sure
that the certificate attribute fields contain the desired values (for
mGuard firmware 4.2
navigate to IPsec VPN » Global »
Machine certificate » Certificate attributes, for mGuard firmware 5.0 or later
navigate to Authentication » Certificates »
Certificate settings and Certificate
attributes).
To request a certificate select one or more
devices in the device overview table and select Certificate
Handling » Request Additional Certificate or Certificate
Handling »
Request Replacement Certificate from the context menu. The
difference is that Request Additional Certificate
will append the new certificate to the list of existing certificates
while Request
Replacement Certificate will
replace the existing certificates with the new one, so that the device
ends up with a single machine certificate.
The mdm server will request certificate(s)
from the CA and will assign them to the device(s).

SCEP requires that a one-time challenge
password is entered for each certificate request. Therefore, certificate
requests can only be performed for a single device if SCEP is
used. The mdm client will open a dialog window in which to enter
the challenge password; please consult the documentation of your
CA server on how to obtain the password. |

OCSP and CRLs are not supported by
mGuard 4.2.
Nevertheless, if you would like to use firmware releases newer
than 4.2 with CRL/OCSP support, you should configure values for
these attributes. |
Importing a machine certificate (mGuard firmware
4.2)
To import a certificate navigate to IPsecVPN » Global » Machine certificate »
Machine certificates and click on the Import button
(the Import button is only enabled if
Custom or Custom+Locally
appendable is selected as value for the machine certificate table).
Select the file containing the machine certificate and click on Open. The machine certificate is subsequently
shown in the table if the import was successful, otherwise an error message
will be displayed.

Only the first entry of the machine
certificate table is used as machine certificate. |
Importing a machine certificate (mGuard firmware
5.0 or later)
To import a certificate navigate to
Authentication » Certificates » Machine
Certificates and click on the Import button
(the Import button is only enabled if
Custom or Custom+Locally
appendable is selected as value for the machine certificate
table). Select the file containing the machine certificate and click on
Open. The machine certificate is subsequently
shown in the table if the import was successful, otherwise an error message
will be displayed.
Deleting machine certificates
To delete a machine certificate, navigate
to Authentication » Certificates » Machine
Certificates, select the certificate in the certificate table and
click on the Delete certificate button.

Deleting a certificate does not automatically
revoke the certificate.
|
Revoking machine certificates
To revoke a machine certificate, navigate
to Authentication » Certificates » Machine
Certificates, select the certificate and click on the button Revoke certificate. This button is enabled
only if exactly one machine certificate is selected. After revoking a
certificate the text *** REVOKED *** is
automatically shown in the corresponding info field of the table. Any
time a certificate is revoked, the mdm CA exports a new file containing
all revoked certificates of this issuer.
If you need more information on the export
of CRL files, please contact Phoenix Contact (phoenixcontact.com).

SCEP does not support revoking certificates.
|

CRLs are only supported by mGuard firmware 5.0 and newer.
|

Revoking a certificate does not delete
the certificate from the table.
|
Manual certificate enrollment
If certificates issued by a CA are to be used,
but requesting them online (from the mdm CA or via SCEP) is not an option,
mdm supports manual certificate enrollment. Any CA software or service
can be used. Follow these steps to enrol certificates manually for a number
of devices:
1.Select
one or more devices in the device overview table and select Certificate
Handling » Issue and Export Certificate Requests
from the context menu.
2.A
file selection dialog opens. Select a directory and click on the Choose button.
3.mdm
will generate private keys and certificate requests for the devices. The
private keys are (invisibly) associated with the respective devices. The
certificate requests are stored in the selected directory as PEM encoded
files (one request per device).
4.Import
the certificate requests into the CA and let the CA issue certificates.
Please consult the documentation of your CA software or service for details
of how to do this.
5.Select
New » Import X.509 Certificates from
the main menu.
6.A
file selection dialog opens. Select the certificate files issued by the
CA.
7.Select
from the Import Settings whether to add the certificates or replace any
certificate that may already exist in a device. Click on the Choose
button.
8.mdm
automatically associates the certificates with the correct devices and
stores them in the machine certificate tables.
7.4.2CA
certificates (mGuard firmware
5.0 or later)
Importing CA certificates
Beginning with mGuard release
5.0 CA certificates (root or intermediate) are supported. To import a
CA certificate navigate to Authentication »
Certificates » CA Certificates and click on the Import button
(the Import button is only enabled if
Custom or Custom+Locally
appendable is selected as value for the CA certificate table).
Select the file containing the CA certificate and click on Open.
The CA certificate is subsequently shown in the table if the import was
successful, otherwise an error message will be displayed.
7.4.3Remote
certificates (mGuard firmware
5.0 or later)
Importing remote certificates
To import a remote certificate navigate to
Authentication » Certificates » Remote
Certificates and click on the Import button
(the Import button is only enabled if
Custom or Custom+Locally
appendable is selected as value for the remote certificate
table). Select the file containing the remote certificate and click on
Open. The remote certificate is subsequently
shown in the table if the import was successful, otherwise an error message
will be displayed.
7.4.4Connection
certificates
Importing connection certificates
The connection certificate can only be imported
in a VPN connection. To import the certificate navigate to IPsec
VPN » Connections » Connection
Name » Authentication. To import
a certificate select Custom as value
for the Remote X.509 certificate and
click on the  icon. Select the file containing
the certificate and click on Open. Subsequently
the content of the file is shown in the certificate field. The validity
of the data is checked when uploading the configuration to the mGuard.
icon. Select the file containing
the certificate and click on Open. Subsequently
the content of the file is shown in the certificate field. The validity
of the data is checked when uploading the configuration to the mGuard.
7.5Use
X.509 certificates (mGuard firmware
5.0 or later)
The certificates which are managed in the
tables discussed in Chapter 7.4 can
be used for the configuration of SSH and HTTPS authentication. The usage
is exemplarily explained for the SSH authentication. Please navigate in
the Device properties dialog to
Management » System settings » Shell access »
X.509 authentication. To use a certificate, e.g. a CA certificate,
you have to select Custom for the CA
certificate table and then click on Add certificate.
Please enter the short name of the
certificate as specified in the CA certificate table in Authentication »
Certificates » CA Certificates. mdm does not check whether
the short name of the certificate exists.
7.6Manage firmware upgrades with
mdm
mdm
supports the management of the firmware of your mGuards.
The firmware itself is not uploaded to the device by mdm. mdm instructs
the device during the configuration upload to download a firmware upgrade
package from an upgrade server and apply it.
Prerequisites
–An
upgrade server has to be set up and the required update packages etc.
have to be put on the server. The upgrade server has to be accessible
from the devices (and not necessarily from mdm).
–The
server has to be configured in the device configuration (or in the template
configuration). For 4.2 devices please navigate in the Properties
Dialog to Management » Firmware
upgrade » Upgrade servers or for 5.0 devices or later navigate
to Management » Update » Firmware
upgrade » Upgrade servers to add your upgrade server to the
configuration.
–If
you use the automatic firmware upgrade (see section below) together with
a pull upload, make sure that the field Firmware
Version on Device (see Chapter 6.3.3)
has a valid value. The value can either be entered manually or alternatively
mdm will automatically fill in this information after the initial push
upload or pull configuration feedback. If entered manually the Firmware
Version on Device field must exactly match
the string shown in the icon in the upper-left corner of the mGuard’s web interface, e.g. 6.1.0.default.
Scheduling a firmware upgrade
There
are two ways to schedule a firmware upgrade:
–Explicitly
specify the target firmware
To do so please navigate in the Device properties dialog to Management »
Firmware upgrade » Schedule firmware upgrade for
4.2 devices or navigate to Management » Update »
Firmware upgrade » Schedule firmware upgrade for 5.0 or newer
devices. Enter the name of the package in the field Package
set name and set Install package set to
Yes.
–Perform
an automated upgrade
If you wish to use the automatic upgrade please navigate in the Device
properties dialog to
Management » Firmware upgrade » Schedule
firmware upgrade for 4.2 devices or navigate to Management »
Update » Firmware upgrade » Schedule firmware upgrade for
5.0 devices. Select one of the following options in Automatic
upgrade:
–Install
latest patches
This option will upgrade your device to the latest available patch release,
e.g. from release 4.2.1 to release 4.2.3.
–Install
latest minor release
This option will upgrade your device to the latest available minor release,
e.g. from release 5.0.1 to release 5.1.0.
–Install
next major version
This option will upgrade to the next major release, e.g. from release 4.2.3
to release 5.1.0.
Please make sure that the major upgrade licenses for the devices are present
in mdm (see Chapter 7.2) prior
to initiating a major release upgrade.
Alternatively
you can schedule the automatic firmware upgrade for one or more devices
using the context menu of the device overview table. Please open the context
menu by right-clicking on the device table, then select the desired upgrade
option.

To finally initiate the firmware upgrade
the configuration has to be uploaded to the devices, after performing
the steps above. |
Canceling
the scheduled firmware upgrade
You
can unschedule a scheduled firmware upgrade with the option Unschedule
upgrade in the context menu of the device overview table.
Upgrade
process
When
performing an upgrade it is important to follow the correct order of the
steps.
Let
us assume you would like to upgrade a device from release 4.2.3 to 5.1.0.
The current firmware version configured (in the field Firmware
Version in the Device properties dialog) in mdm is 4.2 corresponding to the
firmware version on the device, which is also a 4.2 version. This should
be indicated in the Version on Device field
in the device overview table (see Chapter 6.3.1).
Make
sure that all required prerequisites (see section Prerequisites above) are fulfilled
and start a configuration upload for the device (see section Scheduling a firmware upgrade above).
First
the icon in the Version on Device column
will change to  ,
indicating that a firmware upgrade has been scheduled with the next upload.
As soon as the configuration upload is started, the icon changes to
,
indicating that a firmware upgrade has been scheduled with the next upload.
As soon as the configuration upload is started, the icon changes to  , indicating that
a firmware upgrade is ongoing on the device (the
, indicating that
a firmware upgrade is ongoing on the device (the  icon
is only shown when performing a push upload). mdm polls the device periodically
to get a feedback on the result of the firmware upgrade, which will finally
be shown in the Version on Device field
in the device overview table and in the U column
of the device overview table.
icon
is only shown when performing a push upload). mdm polls the device periodically
to get a feedback on the result of the firmware upgrade, which will finally
be shown in the Version on Device field
in the device overview table and in the U column
of the device overview table.
The
Version on Device field should now indicate
a firmware mismatch, since the device has been upgraded to 5.1.0, but
the mdm configuration for the device is still set to version 4.2. Therefore
you should change the firmware version for the device to match the currently
installed firmware. This has to be performed after the
firmware upgrade on the device took place.
You
can change the firmware version in the field Firmware
version in the Device properties dialog or using the context menu of the device
overview table.
You
can now start to configure features introduced with the new firmware version.
Monitoring
the firmware upgrade
The
firmware upgrade progress and the result is indicated by the icon in the
column Version on device in the device
overview table. Please refer to Chapter 6.3.1
for more information.
7.6.1Updating FL MGUARD 1000 devices
using a Python script
Currently
it is not possible to install patch updates (mGuard NT 1.3.x) for FL MGUARD
1000 devices via the mdm client (e.g. an update from mGuard NT 1.3.2 to
1.3.3).
In
this case, use a supplied Python script instead to install the patch updates
via the command line.
Proceed
as follows:
• Download
the update file from the respective device page in the Phoenix Contact
Web Shop (phoenixcontact.net/product/2981974
-->
mguard-image-devel-1.3.x.mguard3.update.signed)
•Use
a Python REST client from the Windows/Ubuntu command line to upload the
file to the device and install it there. (You will need administrator
rights).
A)
Windows
•Enter
the following command on the command line:
"<mdm>\python\python.exe"
"<mdm>\python\tools\mgclient\main.py" save -i /update
-b https://<ip address>/api/ -a v1 -u admin -p <password>
-w "<updates>\<signed update file>"
• The
update is executed.
•Check
if any error messages are displayed.
•Wait
until the device has been automatically restarted.
A)
Ubuntu
•Enter
the following command on the command line:
python3.8 /usr/share/mdm-server/python/tools/mgclient/main.py
save -i /update -b https://<ip-address>/api/ -a v1 -u admin -p <password>
-w <updates>/<signed update file>
•The
update is executed.
•Check
if any error messages are displayed.
•Wait
until the device has been automatically restarted.
Description
<mdm>
= Installation directory of mdm (default: "C:\Program Files\mGuard
device manager").
<ip
address> = IP address via which the FL MGUARD 110x device can
be reached.
<password>
= Password used to log on to the mGuard device.
<updates>
= Directory in which the update file is stored.
<signed
update file> = File name of the update file.
Example
(Windows):
"C:\mdmdm\python\python.exe"
"C:\mdm\python\tools\mgclient\main.py" save -i /update -b https://192.168.1.1/api/
-a v1 -u admin -p private -w "C:\mdm\updates\ mguard-image-devel-1.3.3.mguard3.update.signed"
Example
(Ubuntu):
$ python3.8 /usr/share/mdm-server/python/tools/mgclient/main.py
save -i /update -b https://192.168.1.1/api/ -a v1 -u admin -p private
-w /home/user/Downloads/mguard-image-devel-1.3.3.mguard3.update.signed
7.7Rollback
support
Configuration rollback is supported on devices
with firmware version 5.0 or later. A rollback is performed by the device
if it cannot access the configuration pull server after applying a pull
configuration (this is interpreted by the device as misconfiguration).
To enable rollback for a device please navigate in the Properties
Dialog to Management » Configuration
Pull and set the option Rollback misconfigurations to
Yes.
7.8Redundancy mode
If a device or template is in redundancy mode,
it represents a pair of redundant mGuards
(i.e. two physical devices). Settings and configuration variables which
must or may be different for the two physical devices of a redundant
pair can be set separately.
Additional navigation tree nodes and variables
are visible in the Device and Template properties
dialog in redundancy mode. Nodes and variables prefixed with
Device#2 are used for the second device while those without prefix are
used for the first device.
Separate settings
The following settings exist separately for
the physical devices, but are not normally set by the user:
–Firmware
Version on Device
–Pull
filename
–Serial
Number
–Flash
ID
The following variables must be set to different
values for the physical devices:
–The
external and internal network settings in router mode.
–The
stealth management address settings in stealth mode.
–The
IP settings for the dedicated redundancy state synchronization interface
(if this interface is used).
The following variables may be set to different
values for the physical devices:
–The
hostname
–The
SNMP system name, location, and contact
–The
MTU settings
–The
http(s) proxy settings
–The
passwords of the mGuard
users
–The
Quality of Service settings
–The
redundancy priority
–The
redundancy connectivity check settings
–The
remote logging settings
Upload
When an upload to a redundant device pair
is initiated, the two configurations are uploaded to the physical devices.
The two uploads to the mGuards
forming a redundant pair are never performed simultaneously (but may be
performed simultaneously with uploads to other devices). An upload to
a redundant pair is considered successful once the upload to both physical
devices has succeeded.
Pull export
A pull configuration export for a redundant
device pair creates two configuration profiles. The filename of the profile
for the second device has _2 appended to the base name.