
5mdm client – Overview
The mdm client is the graphical front-end to access all features of mdm. It allows to create and manage devices, templates, pools, and VPN groups, initiates the upload of configurations to devices or initiates the export of configuration files to the file system.
For information on how to start and stop the client see “Start and stop mdm server / mdm client” on page 43.
Before connecting to the server, you have to authenticate yourself in the login-window. Furthermore the server IP address/hostname and the server port to be used can be set in the login window.
Figure 5-1 The mdm client login window
There are three predefined user accounts: root, admin and audit. The user root can access all settings, admin can by default modify all configuration settings and read user management settings, whereas audit has read-only permission by default, i.e. the audit user cannot change any settings, except for his password. The permissions for the users can be changed, if desired (see “Manage users, roles, and permissions” on page 139). The default passwords for user admin is admin, the default password for user audit is audit, the default password for root is root.
|
It is highly recommended to change the default passwords after installation (please refer to “Manage users, roles, and permissions” on page 139). |
Using multiple clients
Multiple mdm clients using an mdm server instance concurrently are fully supported only by the mdm Unlimited Edition. All other available editions still have the limitation to two concurrent clients. Entities are locked if this is necessary to prevent two users from editing the same variable simultaneously. This includes inheritance hierarchies (where a user could edit a variable that a descent template or device inherits), but not synthesized VPN connections (which are read-only in the receiving device). If another user tries to open the device or the template an error message will be displayed. If a client opens a Template properties dialog, then the template and all devices referencing this template will be locked and cannot be opened by another user.
The same is true for pools and VPN groups.
In case the connection between a client and a server is interrupted and cannot be terminated gracefully, the device/template/pool/VPN group that was locked by that client will get released after an inactivity timeout (can be configured in the server configuration, see “mdm server (preferences.xml file)” on page 183, key maxInactiveInterval), i.e. it could happen that certain settings cannot be accessed until the inactivity timeout is reached.
The following screenshot shows the mdm main window:
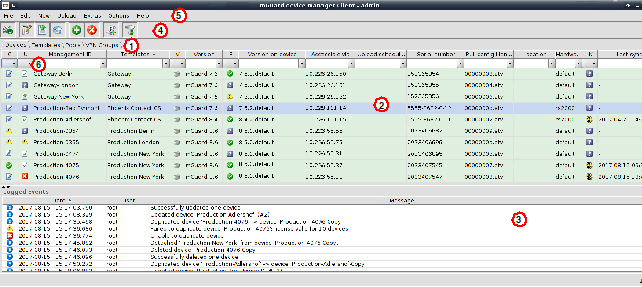
Figure 5-2 mdm main window
The mdm main window is divided into a tab area ① to open the device/template/pool/VPN group overview tables ( e.g. ② ) and a log window ③.
It also contains a tool bar ④ and the main menu ⑤. If enabled, the entries in the different columns can be filtered by typing any term in the text fields ⑥.
The different sections and their functionality are explained in the following chapters.
The following entries can be selected in the mdm main menu.
|
The mdm main menu |
||
|---|---|---|
|
File |
Connect to Server/Disconnect from Server |
Connects to or disconnects from the server. |
|
Exit |
Exits the client. |
|
|
Edit |
Edit Item |
Opens the Properties Dialog of the currently selected item (device, template, pool, or VPN group) in the overview table. |
|
Web Configure |
Opens the Web GUI for the selected devices in the device table. 
|
|
|
Cut |
Cuts the marked text in the currently active table filter field to the clipboard. |
|
|
Copy |
Copies the marked text in the currently active table filter field to the clipboard. |
|
|
Paste |
Pastes the clipboard contents to the currently active table filter field. |
|
|
Select All |
Selects all entries in the currently active overview table. |
|
|
New |
Device |
Creates a new device and opens the Device properties dialog. |
|
|
Template |
Creates a new template and opens the Template properties dialog. |
|
|
Pool |
Creates a new pool and opens the Pool properties dialog. |
|
|
VPN Group |
Creates a new VPN group and opens the VPN Group Properties Dialog. |
|
|
Opens a window that allows to select an import file. With the device import option, you can import an automatically (e.g. with a script) generated file of devices. This can be used to create a large number of devices in mdm without going through the process of creating them manually. The import file must be comma-separated value (CSV) formatted. Either a comma (,) or a semicolon (;) can be used as a field separator. Each record (line) in the file describes a single device and consists of the following fields: Field > Description #0 > Management ID #1 > Firmware Version #2 > Template Name #3 > Reachable via” address #4 > Serial Number #5 > Flash ID #6...#n > Variable assigments The Management ID and Firmware Version (fields #0 and #1) are mandatory, all other fields are optional. If a field is empty or non-existent, the corresponding attribute is not set. The Firmware Version field must be a supported firmware version (without patchlevel) as it would appear in the Version column of the device overview table, e.g. mGuard 6.1. The Template Name must either be the name of an existing template, which is assigned to the new device, or empty, in which case no template is assigned. Scalar variables (i.e. variables that store a single value and are not contained in a table) can be set with an assignment of the form <VARIABLE_NAME>=<VALUE>. Example record: My Device,mGuard 6.1,,192.168.2.3,17X46201,,ROUTERMODE=router,MY_LOCAL_IP=192.168.2.3 (Please note that the record must be contained in a single line.) If a record is not valid, it is skipped and an error message is logged. |
|
|
Import X.509 Certificates |
Import certificates created during the manual certificate enrollment process (see “Machine certificates” on page 143 for more detailed information). |
|
|
Upload |
For an overview of the configuration upload process and the different upload methods see “Upload configurations to mGuard devices” on page 131. |
|
|
Selected |
Uploads configurations to the devices currently selected in the device table. |
|
|
Changed |
Uploads configurations to the devices with a configuration status of out-of-date. |
|
|
All |
Uploads configurations to all devices. |
|
|
Extras |
Manage Device |
Manage your license vouchers and device licenses. For information on how to manage licenses and vouchers see “Manage license vouchers and device licenses” on page 136. |
|
|
Manage License Vouchers... |
|
|
|
Manage Profile Keys |
Manage your profile keys. For information on how to manage profile keys see “Manage Profile Keys” on page 134. |
|
|
Change Own Password |
Opens a dialog that enables the current user to change the password. |
|
Manage Users And Roles |
Manage your users and roles. For information on how to manage users and roles see “Manage users, roles, and permissions” on page 139. |
|
|
Default Browser |
Please specify a command line to be used to start the browser. The command line should start with the full path and the name of the binary. Append the string {url}, which will be replaced with the URL of the mGuard, e.g. on Windows enter: C:\Program Files\Firefox\Firefox.exe {url} |
|
|
This is the firmware version that will be used when creating a new device or template. |
||
|
Disable Filtering |
The filter in the device, template, pool, and VPN group table can be switched on and off using this option. |
|
|
Help |
About... |
Shows information about the currently installed mdm version and included third-party software. |
|
mdm User Manual |
Opens the mdm User Manual in a web browser (internet connection required). |
|
|
mdm Server License... |
Shows the installed mdm license. |
|
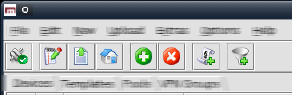
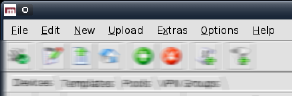
The tool bar offers short-cuts to some of the functions in the main menu or the context menu.
|
The mdm toolbar |
||
|---|---|---|
|
|
|
No connection to server; if clicked: connect to server. |
|
|
Connection established; if clicked: disconnect from server. |
|
|
|
Edit the selected entry (device, template, pool, or VPN group). |
|
|
|
Upload the configuration to the selected devices. |
|
|
|
Upload the configuration to the selected devices. |
|
|
|
Open the Web GUI of the selected devices in the device table. |
|
|
|
Delete the currently selected entries. |
|
|
|
Open a dialog to generate/request licenses from the license server for the selected devices. |
|
|
|
Add an entry (device, template, pool, or VPN group) and open its Properties Dialog. |
|
|
|
Filter of the current overview table (device, template, pool, or VPN group) is active. If clicked: deactivate the filter. |
|
|
|
Filter of the current overview table (device, template, pool, or VPN group) is inactive. If clicked: activate the filter. |
|
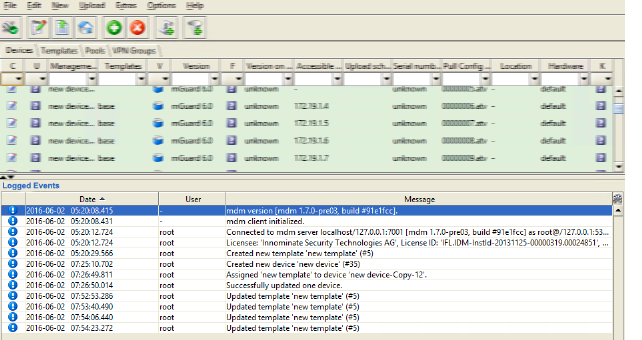
The log window shows various events, including the following:
–Upload results.
–Creation, deletion, modification of a device, template, pool, VPN group, user, or role.
–Connect or disconnect of the client.
For each event, the severity, the date and time, the user name, and a message are logged. If an event is not the result of a user action, “–” is logged instead of the user name. Double-clicking on a log entry opens a window with detail information.
Sorting the table
The header of the table can be used to sort the table entries. A click on a header of a column will activate the (primary) sort based on this column. This is indicated by the arrow in the column header. A second click on the same header will reverse the sort order. Clicking on another column header activates the sort based on this new column, the previously activated column will be used as secondary sorting criterion.
The context menu is opened by clicking on the log window with the right mouse button.
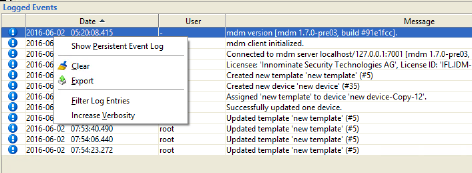
The following actions can be performed.
|
Log window context menu |
||
|---|---|---|
|
|
Show Persistent Event Log |
Opens the Persistent Event Log Window (see “Persistent Event Log” on page 53). |
|
|
Clear |
Deletes the log entries. This applies to the current mdm client only, i.e. other clients are not affected. |
|
|
Export |
Opens a file chooser window and exports the log entries to an XML file. |
|
|
Filter Log Entries |
Enables or disables the filter for the log entry table. If the filter is enabled, the first row of the table accepts the input of regular expressions (see Chapter 11, Regular expressions), which can be used to efficiently filter the table entries. |
|
|
Increase Verbosity |
Enables or disables verbose logging. If verbose logging is enabled, some events which are not normally useful and may be confusing are logged. |
Auto-scrolling
If a new event is logged, the log window is automatically scrolled so that the new entry is visible by default. The auto-scrolling mechanism can be disabled and re-enabled by clicking on the  icon in the upper right corner of the log window.
The Persistent Event Log window shows selected events in the same manner as the log window. Unlike the entries in the log window, the entries in the Persistent Event Log Window are stored persistently in the mdm database, i.e. they are retained even if the mdm server is restarted.
The number of days, after which the entries in the database expire (default: 200 days) can be configured in the file preferences.xml (node event).
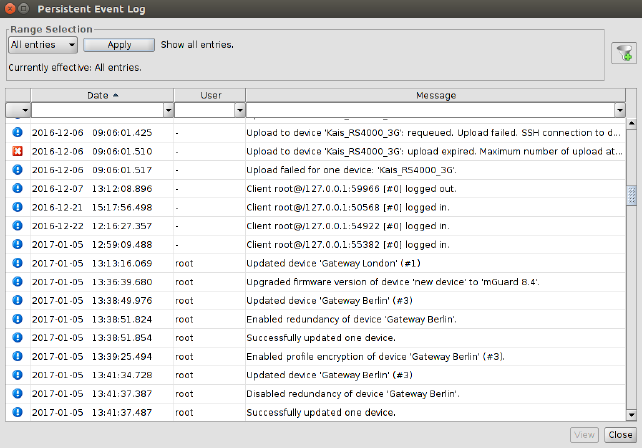
Range selection
Since there can be a large number of persistent log entries, not all entries are automatically loaded from the mdm server when the dialog is opened. By changing the criteria in the Range Selection field and clicking the Apply button, the history entries matching the specified critera can be loaded.
|
By default, the latest (i.e. newest) 100 entries are loaded. |
|
The persistent event log |
||
|---|---|---|
|
|
All Entries |
Loads all log entries. 
|
|
|
Time Range |
Loads all entries which have been created during a time range. The time range must be specified: –If a lower bound, but not an upper bound is specified, all entries newer than the lower bound are loaded. –If an upper bound, but not a lower bound is specified, all entries older than the upper bound are loaded. –If both a lower and an upper bound are specified, all entries created during the time interval given by the bounds are loaded. Times are specified as an ISO date (YYYY-MM-DD where YYYY is the year, MM is the month of the year between 01 and 12, and DD is the day of the month between 01 and 31) optionally followed by an ISO time (hh:mm:ss where hh is the hour according to the 24-hour timekeeping system, mm is the minute and ss is the second). For example, a quarter past 4 p.m. and 20 seconds on December 22nd, 2010 would be written as 2010-12-22 16:15:20. Alternatively, click on the |
|
|
Last Entries |
Loads the latest (i.e. newest) entries. The number of entries must be specified. |
5.3.3Logging events via syslog
The same events logged in the persistent event log (see “Persistent Event Log” on page 53), or a subset selected by the severity, can be sent to a syslog server (see “mdm server (preferences.xml file)” on page 183).
Most mGuard devices support the same configuration variables, irrespective of their hardware. However, the FL MGUARD RS2000 / TC MGUARD RS2000 3G / TC MGUARD RS2000 4G / FL MGUARD RS2005 supports only a limited set of variables. FL MGUARD RS2000 devices (rs2000) can be managed with mdm through its hardware flavor mechanism.
A device can be set to one of two hardware flavors, default or rs2000 (FL MGUARD RS2000). Setting it to rs2000 has the effect that variables not supported by this platform are omitted.
|
Preconditions: Firmware version must be mGuard 7.5 or later, and redundancy must be disabled. |
Templates have no hardware flavor; they always contain all the variables corresponding to the default flavor. If variables not supported by a device set to the FL MGUARD RS2000 (rs2000) flavor are inherited from a template, such variables are ignored.
Some variables are supported on FL MGUARD RS2000 devices, but have only a limited range of supported values. If such a variable is inherited by a device set to the FL MGUARD RS2000 (rs2000) flavor, and the inherited value is not supported, the variable becomes invalid and must be corrected in the configuration dialog before the device can be uploaded. The mdm 1.12.x does not support TC MGUARD RS2000 3G/4G and FL MGUARD RS2005 devices as a separate hardware flavor. The hardware flavor rs2000 (FL MGUARD RS2000) with network mode Router should be used instead.
The new FL MGUARD 1102/1105 devices, configurable in mdm 1.12.0, support fewer variables than the devices of the FL/TC MGUARD 2000/4000 family (MGUARD2 platform).
For this reason, the following aspects must be considered when configuring them:
– Some functions, which can be accessed via the mdm menu or via context menus, cannot be applied to the devices of the FL MGUARD 1000 family.
– The transfer of a configuration from devices or templates of the MGUARD2 platform (firmware mGuard 5.0 to 8.8.x) to FL MGUARD 1000 devices (or templates) is basically possible:
–Unsupported variables are discarded in this case.


 icon to select the date from a calender.