
Create certificates only if you are sure to master the certificate creation.
9Creating and managing certificates
It is assumed that the reader has an extensive knowledge of certificates, certificate creating and public key encryption.
|
Create certificates only if you are sure to master the certificate creation. |
This chapter explains the usage of OpenSSL to create certificates.
It is important to note that mdm requires two different types of certificates and keys:
–Certificates and keys used to secure the communication between the mdm components
–Certificates and keys used for the PKI
How to create certificates and keys to be used for the SSL communication is explained in Chapter 9.1. The certificates and keys used in a PKI are described in Chapter 9.2.
|
Please note that the process described in this section to create certificates is just one example of the usage of OpenSSL. There are also alternative ways to create your certificates. If you are not familiar with OpenSSL you should exactly follow the instructions below. |
|
The use of OpenSSL 1.1.1b or later is recommended, due to several important security fixes. |
Keystores
Certificates and keys are stored in databases called keystores. A keystore is a file, containing the certificates and keys in encrypted form. To access the information in a keystore a passphrase is required. Keystores can have different formats, common formats are e.g. PKCS#12 or the proprietary Java KeyStore format (JKS). The encryption algorithm can usually be selected when creating the keystore. AES256 is recommended.
The OpenSSL configuration file
OpenSSL uses default values specified in the configuration file openssl.cnf (the directory where this file is located depends on your distribution, e.g. check in the directory /usr/ssl or /usr/lib/ssl).
If you omit mandatory arguments of a command, OpenSSL uses the default settings defined in the configuration file. If possible, all mandatory arguments for the example commands below are explicitly stated, i.e. if you use the commands as described below the important information is taken from the command line and not from the configuration file. If the configuration file is required for the respective command it is explicitly mentioned in the text.
For further information about the syntax and content of the configuration files, please refer to OpenSSL's documentation, particularly to the manual pages genrsa(1ssl), req(1ssl), ca(1ssl) and openssl(1ssl).
9.1Certificates and keys for SSL
To set up a secure connection between entities (e.g. ET1, ET2) usually the following components are required:
–a private key for each entity participating in the communication:
–ET1key
–ET2key
The term private key already implies that it is important to keep these keys private and store them at a location only accessible to the administrator.
–and the corresponding certificates:
–ET1cert
–ET2cert
The certificates contain among other information
–the public key of the entity
–information about the entity, e.g. the name and/or the IP address
–further information about the certificate, e.g. the intended usage
The certificate is either digitally signed with the private key of the respective entity (self-signed) or with a CA key.
The certificates are public and can be distributed to anyone participating in the communication.
ET1 will use the public key contained in ET2cert to encrypt the data sent to ET2. This assures that only ET2 is able to decrypt the data. If ET2cert is self-signed it is assured that public key contained in ET2cert corresponds to ET2key. If ET2cert is signed by a CA it is assured that the public key contained in ET2cert really belongs to ET2 (authentication).
Create the private key
ETkey has to be created first using the following command:
openssl genrsa -aes256 -passout pass:yourSSLPW -out privkey.pem 2048
Explanation of the arguments
|
Argument |
Explanation |
|---|---|
|
genrsa |
genrsa instructs OpenSSL to generate an RSA key. |
|
-aes256 |
Use AES256 to encrypt the key. |
|
-passout pass:password |
The password used to encrypt the private key (in the example: yourSSLPW). yourSSLPW is just an example and should be replaced by a secure password. |
|
-out filename |
Name of the file containing ETkey (in the example: privkey.pem). |
|
2048 |
The length of the key. |
:
The command above generates one output file: privkey.pem
This file contains ETkey in PEM format. The key is encrypted with the AES256-algorithm. To access the key you have to know the passphrase specified above (in the example: yourSSLPW). Please use your own, secure password to encrypt the private key.
|
Sometimes it is necessary to create an unencrypted key. In this case just omit the -aes256 and the -passout option in the command above. |
Create the certificate
The certificate is created with the following command:
openssl req -batch -new -x509 -key privkey.pem -keyform PEM
-passin pass:yourSSLPW -sha256 -outform PEM -out serverCert.pem
Explanation of the arguments:
|
Argument |
Explanation |
|---|---|
|
req |
req instructs OpenSSL to generate a certificate request (default) or a certificate. |
|
-batch |
Non interactive mode. |
|
-new |
Create a new request or a new certificate. |
|
-x509 |
Create a self signed certificate instead of a certificate request. |
|
-key filename |
The corresponding private key (in the example: privkey.pem). |
|
-keyform PEM |
The private key is in PEM format. |
|
-passin pass:password |
Password required to decrypt the private key (in the example: yourSSLPW). |
|
-sha256 |
Use the SHA256 algorithm to create the message digest for the signature (recommended). |
|
-outform PEM |
The format of the output file is PEM. |
|
-out filename |
The name of the output file, i.e. the certificate (in the example serverCert.pem). |
The command above generates one output file: serverCert.pem
This file contains the self-signed certificate ETcert.
The keys and certificates have to be included in keystores. The installation archive mdm-ca-1.11.x.zip contains the (proprietary) java tool ImportKey in the demoCA directory which can be used to create and manage keystores. Please copy the file ImportKey.class to your working directory.
First ETkey has to be converted to PKCS#8 format and both ETkey and ETcert have to be included in a keystore. In the example, Java KeyStore format (JKS) is used. This can be accomplished with the tool ImportKey. ImportKey does accept the (unencrypted) key on standard input only, therefore the output of the pkcs8 command has to be piped as follows:
openssl pkcs8 -topk8 -in privkey.pem -passin pass:yourSSLPW
-inform PEM -nocrypt -outform DER |java -cp . ImportKey
-alias yourAlias -storetype JKS -keystore serverKeystore.jks
-storepass pass:yourSSLPW -keypass pass:yourSSLPW
-chain serverCert.pem
Explanation of the openssl arguments:
|
Argument |
Explanation |
|---|---|
|
pkcs8 |
The pkcs8 command is used to process private keys in PKCS#8 format. |
|
-topk8 |
Use a traditional format private key as input and write a key in PKCS#8 format key. |
|
-in filename |
The name and the location of the input file (in the example: privkey.pem). |
|
-passin pass:password |
Password required to decrypt the input (in the example: yourSSLPW). |
|
-inform PEM |
The input format of the key is PEM. |
|
-nocrypt |
The output (the key) is not encrypted. |
|
-outform DER |
The ouput format is DER. |
Explanation of the ImportKey arguments:
|
Argument |
Explanation |
|---|---|
|
-alias name |
A keystore can contain multiple entries. The alias identifies the entry and therefore has to be unique in the keystore. Aliases are case-insensitive. |
|
-keystore filename |
The file containing the keystore (in the example: serverKeyStore.jks). |
|
-storetype JKS |
Use JKS as format for the keystore. |
|
-storepass pass:password |
Password required to decrypt the contents of the keystore (in the example: yourSSLPW). |
|
-keypass pass:password |
Additional password required to decrypt the private key in the keystore. |
|
-chain filename |
The certificate (in the example serverCert.pem). |
The command above generates one output file: serverKeyStore.jks
This is the keystore containing the certificate and the private key.
After creating the keystore it is sometimes necessary to import additional certificates into the keystore. This can be accomplished by using the following command:
java -cp . ImportKey -alias yourAlias -storetype JKS
-file additionalCertificate.pem -storepass pass:yourSSLPW
-keystore serverKeystore.jks
Explanation of the ImportKey arguments:
|
Argument |
Explanation |
|---|---|
|
-alias name |
A keystore can contain multiple entries. The alias identifies the entry and therefore has to be unique in the keystore. Aliases are case-insensitive. |
|
-keystore filename |
The file containing the keystore (in the example: serverKeyStore.jks). |
|
-storetype JKS |
The format for the keystore. |
|
-storepass pass:password |
Password required to decrypt the contents of the keystore (in the example: yourSSLPW). |
|
-file filename |
The certificate to be imported (in the example additionalCertificate.pem). |
9.2Certificates and keys for a PKI
When rolling out a Private Key Infrastructure (PKI), which is basically your intent when using the mdm CA, there are more requirements to be taken into account than mentioned in the previous chapter. This chapter first describes some of the PKI basics and then the usage of OpenSSL to roll out a PKI.
|
Please note that the certificates described in this section are not used for SSL. |
|
Please note that the certificates and keys described in this section are not stored in the SSL-keystore of the mdm CA, but in the CA-keystore. |
PKI basics
Among others the main reasons for using a PKI are:
–Authentication
When communicating using data networks it is in most cases not possible to “see” the entity on the remote side (exception: video telephony), i.e. one cannot be sure that the entity on the remote side is the one it claims to be. The usage of a PKI assures the authenticity of the entities communicating with each other.
–Data confidentiality
This is the reason VPNs are used to exchange data: The data packets are sent “in the public” (Internet), but unauthorized entities are prevented from accessing the information contained in the packets.
–Data integrity
The assurance that the information received is identical to the information sent by the other entity. This prevents information to be altered by an entity “in the middle” which is not authorized to participate in the communication.
It is beyond the scope of this document to describe all components and their interactions involved in a complete PKI, therefore only the most important are mentioned here:
–Certificates and private keys
Certificates are the means in a PKI to assure authentication. The identity of the certificate owner is approved by a CA by signing the certificate request of the respective owner. The public and private keys are used to encrypt/decrypt data and therefore assure data confidentiality.
–Certification Authority (CA)
A Certification Authority is a component in a PKI which assures authenticity of the participating entities by signing certificate requests (i.e. issuing certificates). Usually there are multiple CAs in a PKI organized in a hierarchical structure with one root CA at the top.
–CRL Distribution Points (CDP)
See the following section Certificate extensions.
–Entities communicating with each other
The entities using a PKI use certificates to authenticate themselves and use the public/private key pairs to encrypt/decrypt the exchanged data. The entities request certificates from the CA. Usually a Registration Authority (RA) is also part of a PKI. The RA is responsible for the initial registration of entities that would like to use the PKI. An RA is not required in the mdm usage scenario.
Contents of a certificate
As mentioned in the previous chapter a certificate contains the following information:
–the public key of the entity
–information about the entity, e.g. the name and/or the IP address
–further information, e.g. about the certificate and the infrastructure
The following sections explain the contents in more detail.
The Subject Distinguished Name
The Subject Distinguished Name is a unique identifier of the certificate and its owner. It is composed of several components:
|
Abbreviation |
Name |
Explanation |
|---|---|---|
|
CN |
Common Name |
Identifies the person or object owning the certificate. For example: CN=server1 |
|
E |
E-mail Address |
Identifies the e-mail address of the owner. |
|
OU |
Organizational Unit |
Identifies a unit within the organization. For example: OU=Research&Development |
|
O |
Organization |
Identifies the organization. For example: O=Innominate |
|
L |
Locality |
Identifies the place where the entity resides. The locality can e.g. be a city: L=Berlin |
|
ST |
State |
Identifies the state. For example: ST=Berlin |
|
C |
Country |
Two letter code identifying the country. For example: C=DE (for Germany) |
Depending on your policy, not all of the components are mandatory, but if the extension Subject Alternative Name is not included in the certificate, at least one component that can be used as identifier has to be included, typically this is the Common Name (CN). Please note that currently the mdm CA cannot handle certificates with Subject Alternative Name extensions.
Certificate extensions
Information about the certificate or the infrastructure is contained in the so called certificate extensions. Basically anyone can define its own extensions, but the standard extensions (X.509version3) are defined in RFC 3280 Internet X.509 Public Key Infrastructure - Certificate and CRL Profile. Here is a short description of the extensions that are important for the mdm CA:
–Critical Bit
The Critical Bit is not an extension but used to force the usage of extensions in the certificate. The Critical Bit can be set for any extensions in the certificate. Applications verifying a certificate must be able to interpret an extension with the Critical Bit. If the application is not able to interpret the extension, the certificate must be rejected.
–Basic Constraints
The Basic Constraints extension is used to indicate whether the certificate is a CA certificate or not. Basic Constraints consists of 2 fields:
–cA field of type BOOLEAN and
–pathLenConstraint field (optional) of type INTEGER
For CA certificates the cA field must be set to true. pathLenConstraint is only used if the cA field is set to true and specifies the number of CA levels allowed below this certificate. Basic Constraints should be always marked as critical.
Please refer to Chapter 9.2.3 for requirements regarding the Basic Constraints extension.
–Key Usage
Key Usage controls the intended use of the certificate’s corresponding keys. A key can be e.g. used to sign Certificate Revocation Lists (CRL), encrypt data or to sign certificates.
Please refer to Chapter 9.2.3 for requirements regarding the Key Usage extension.
–Subject Alternative Name
The extension Subject Alternative Name can be used to add more identifiers to the certificate. Subject Alternative Name can contain e.g. e-mail addresses, domain names etc. It can be used as substitute for the Subject as well, which must be empty in this case. Please note that the mdm CA is currently not able to handle Subject Alternative Name extensions.
–CRL Distribution Points (CDP)
Certificates can be revoked, e.g. if a private key was compromised or if it is no longer valid. Usually an application has to check whether a certificate is still valid, by checking the validity period and/or by retrieving revocation information from a CRL distribution point (CDP). To retrieve the information either Certificate Revocation Lists (CRL) can be used or a dedicated protocol like OCSP. However, the certificate should contain the information, which CDP should be contacted.
–Authority Information Access
Authority Information Access is not an X.509 standard extension, but an extension defined by the PKIX working group (http://www.ietf.org/html.charters/pkix-charter.html). Authority Information Access contains information about the issuing CA, e.g. policies, further root certificates or where to retrieve the higher certificates in the chain, if the complete chain is not contained in the certificate.
Depending on the settings of these extensions the receiver (not the owner) of a certificate accepts or denies the communication with the peer, thus preventing any misuse of certificates and creating a higher level of security.
9.2.1Create the CA certificates
Depending on your existing infrastructure the mdm CA needs the following certificates:
–A self-signed root certificate (CArootCert) and the matching private key (CArootKey).
If you have another upstream (root) CA in place, there is no need to generate the root certificate and the matching private key.
The (self-signed) root certificate is distributed to all entities participating in the communication. It is used by the entities to verify the authenticity of the communication peer and of any intermediate CAs in the certificate chain. The private key CArootKey is used to sign the self-signed root certificate.
–A CA certificate (CAcert) and the matching private key (CAkey). This is the certificate used by the CA to authenticate itself to other entities. This certificate has to be signed with the root private key, i.e. either with CArootKey or with the key of your existing root CA. The private key CAkey is used to sign the certificate request sent by the mdm server, i.e. it is used to issue certificates for the mGuards.
–A template certificate (CAtemplCert) which is used by the CA as template when issuing end entity (mGuard) certificates.
Figure 9-1 shows the certificate hierarchy:
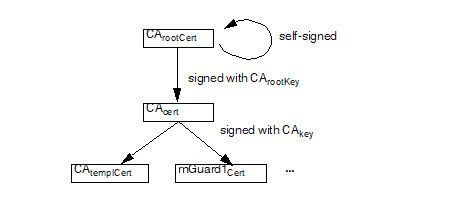
Figure 9-1: mdm CA certificate hierarchy
In the following it is assumed that there is no other root CA in place and that the mdm CA is used as root CA.
|
Important: Please keep the private key(s) at a secure location. In particular this is required for the root CA’s private key. |
|
It is recommended to create a working directory, e.g. called security in the mdm installation directory, where all the certificates and keys created during the following process are located. |
The following OpenSSL commands require input from the OpenSSL configuration file openssl.cnf (the directory where this file is located depends on your distribution, e.g. check in the directory /usr/ssl or /usr/lib/ssl). Instead of changing the standard configuration file of your OpenSSL installation, it is recommend to use the example configuration files provided in the mdm CA installation archive mdm-ca-1.11.x.zip and adapt those files to your needs. You can instruct OpenSSL to use the provided configuration files instead of the standard configuration file.
Adapt the OpenSSL configuration file
Please copy the file rootCert.conf provided in the installation archive
mdm-ca-1.11.x.zip to your working directory. Adapt the [ root_dn ] section of the file, which contains the Subject Distinguished Name of your root CA certificate:
[ root_dn ]
C= DE
O= Innominate Security Technologies AG
OU= Research & Development
CN= Test Root CA
Please note also the [ root_ext ] section of the configuration file, which is important for the proper generation of the root certificate (please refer to Section Certificate extensions for an explanation):
[ root_ext ]
keyUsage= cRLSign, keyCertSign
basicConstraints= critical, CA:true, pathlen:1
Generate the private key
CArootKey has to be created first using the following command:
openssl genrsa -aes256 -passout pass:rootPW
-out rootKey.pem 2048
Explanation of the arguments:
|
Argument |
Explanation |
|---|---|
|
genrsa |
genrsa instructs OpenSSL to generate an RSA key. |
|
-aes256 |
Use AES256 to encrypt the key. |
|
-passout pass:password |
The password used to encrypt the private key (in the example: rootPW). rootPW is just an example and should be replaced by a secure password. |
|
-out filename |
Name of the file containing CArootKey (in the example: rootKey.pem). |
|
2048 |
The length of the key. |
The command above generates one output file: rootKey.pem
This file contains CArootKey in PEM format. The key is encrypted with the AES256-algorithm. To access the key you have to know the passphrase specified above (in the example: rootPW). Please use your own, secure password to encrypt the private key.
Generate the root certificate
The OpenSSL command used to generate CArootCert is:
openssl req -batch -new -config rootCert.conf -x509
-key rootKey.pem -keyform PEM -passin pass:rootPW -sha256 -days 5479 -outform PEM -out rootCert.pem
Explanation of the arguments:
|
Argument |
Explanation |
|---|---|
|
req |
req instructs OpenSSL to generate a certificate request (default) or a certificate. |
|
-batch |
Non interactive mode. |
|
-new |
Create a new request or a new certificate. |
|
-config filename |
The name and the location of the openssl configuration file (in the example: rootCert.conf). |
|
-x509 |
Create a self signed certificate instead of a certificate request. |
|
-key filename |
The corresponding private key (in the example: rootKey.pem). |
|
-keyform PEM |
The private key is in PEM format. |
|
-passin pass:password |
Password required to decrypt the private key (in the example: rootPW).
|
|
-sha256 |
Use the SHA256 algorithm to create the message digest for the signature (recommended). |
|
-days 5479 |
The period for which the certificate will be valid. |
|
-outform PEM |
The format of the output file is PEM. |
|
-out filename |
The name of the output file, i.e. the certificate (in the example rootCert.pem). |
The command above generates one output file: rootCert.pem
This file contains the self-signed root certificate CArootCert.
The intermediate CA certificate CAcert is not self-signed but will be issued (signed) by the root CA. Therefore you first have to create a private key and a corresponding certificate request and then “send” this certificate request to the root CA. The root CA will in return issue CAcert.
First the configuration file has to be adapted to your needs, as described in the previous section.
Adapt the OpenSSL configuration file and the environment
Please copy the file caCert.conf contained in the installation archive
mdm-ca-1.11.x.zip to your working directory. Adapt the [ ca_dn ] section of the file, which contains the Subject Distinguished Name of your root CA certificate:
[ ca_dn ]
C= DE
O= Innominate Security Technologies AG
OU= Research & Development
CN= Test CA
Please adapt also entries crlDistributionPoints and authorityInfoAccess of the [ ca_ext ] section of the configuration file (please refer to Section Certificate extensions for an explanation):
[ ca_ext ]
crlDistributionPoints=URI:http://ca.example.com/ca-ca.crl
authorityInfoAccess=OCSP;URI:http://ca.example.com/ocsp/ca-ca
The configuration file contains some parameters, which cannot be entered on the command line. The entries specify files that have to be present in the file system. Therefore the files have to be created manually first (the filenames are also used in the configuration file caCert.conf , therefore please use exactly the file names as stated below):
–Create a subdirectory archive in your working directory
(Linux: mkdir ./archive)
–Create a file named serial containing a valid serial number for the certificate in the subdirectory archive
(Linux: echo 1234 > archive/serial)
–Create an empty file to be used as openssl database.
(Linux: touch archive/index.txt
Windows: copy NUL: archive/index.txt)
Generate a private key
The private key CAkey has to be created first using the following command:
openssl genrsa -aes256 -passout pass:caPW -out caKey.pem 2048
Explanation of the arguments:
|
Argument |
Explanation |
|---|---|
|
genrsa |
genrsa instructs OpenSSL to generate an RSA key. |
|
-aes256 |
Use AES256 to encrypt the key. |
|
-passout pass:password |
The password used to encrypt the private key (in the example: caPW). caPW is just an example and should be replaced by a secure password. |
|
-out filename |
Name of the file containing the private key (in the example: caKey.pem). |
|
2048 |
The length of the key. |
This command generates one output file: caKey.pem
This file contains CAkey in PEM format. The key is encrypted with the AES256-algorithm. To access the key you have to know the passphrase specified above (in the example: caPW). Please use your own, secure password to encrypt the private key.
Generate a certificate request
To create a certificate request enter the following command:
openssl req -batch -new -config caCert.conf
-key caKey.pem -keyform PEM -passin pass:caPW -sha256
-out caCertReq.pem -outform PEM
Explanation of the arguments:
|
Argument |
Explanation |
|---|---|
|
req |
req instructs OpenSSL to generate a certificate request (default) or a certificate. |
|
-batch |
Non interactive mode. |
|
-new |
Create a new request. |
|
-config filename |
The name and the location of the openssl configuration file (in the example: caCert.conf). |
|
-key filename |
The corresponding private key (in the example: caKey.pem). |
|
-keyform PEM |
The private key is in PEM format. |
|
-passin pass:password |
Password required to decrypt the private key (in the example: caPW). |
|
-sha256 |
Use the SHA256 algorithm to create the message digest for the signature (recommended). |
|
-outform PEM |
The format of the output file is PEM. |
|
-out filename |
The name of the output file, i.e. the certificate (in the example caCertReq.pem). |
The command above generates one output file: caCertReq.pem
This file contains the certificate request.
Request the CA certificate
The request has to be sent to the root CA. Since the mdm CA is the root CA in the example you can issue the certificate with the following command:
openssl ca -batch -config caCert.conf -days 3653
-in caCertReq.pem -cert rootCert.pem -keyfile rootKey.pem
-passin pass:rootPW -md sha256 -notext -out caCert.pem
-outdir .
Explanation of the arguments:
|
Argument |
Explanation |
|---|---|
|
ca |
The ca command is a minimal CA application. It can be used to sign certificate requests and generate CRLs. |
|
-batch |
Non interactive mode. |
|
-config filename |
The name and the location of the openssl configuration file (in the example: caCert.conf). |
|
-days 3653 |
The period for which the certificate will be valid. |
|
-in filename |
The name of the file containing the certificate request (in the example: caCertReq.pem). |
|
-cert filename |
The name of the file containing the root certificate (in the example: rootCert.pem). |
|
-keyfile filename |
The name of the file containing the key used to sign the certificate request (in the example: rootKey.pem). |
|
-passin pass:password |
Password required to decrypt the private key (in the example: rootPW). |
|
-md sha256 |
Use the SHA256 algorithm to create the message digest for the signature (recommended). |
|
-notext |
openssl has an option to include human readable, explanatory text in the certificate. But this would create problems later in the process when creating the keystores, therefore do not include any text in the certificate. |
|
-outdir directoryName |
The output directory (in the example the current working directory “.”). |
The command above generates one output file: caCert.pem
This file contains CAcert.
|
The file caCertReq.pem is not required any more and should be deleted.
|
Create a certificate template
The purpose of the CA is to issue certificates. To do so the CA needs instructions how the certificates to be issued should look like, e.g. which extensions should be included. This can be accomplished by providing the CA with a certificate template (CAtemplCert). CAtemplCert is a certificate issued by the CA. To issue a certificate you first have to adapt an OpenSSL configuration file again.
Adapt the OpenSSL configuration file
Please copy the file templateCert.conf contained in the installation archive
mdm-ca-1.11.x.zip to your working directory. Adapt the entries crlDistributionPoints and authorityInfoAccess of the [ template_ext ] section of the configuration file (please refer to Section Certificate extensions for an explanation):
[ template_ext ]
crlDistributionPoints=URI:http://ca.example.com/ca-ee.crl
authorityInfoAccess=OCSP;URI:http://ca.example.com/ocsp/ca-ee
|
Please note that the configuration file templateCert.conf expects files to be existent that have to be manually created. (see previous section Create the CA certificate, subsection Adapt the OpenSSL configuration file and the environment). |
Generate a private key
The private key has to be created first using the following command:
openssl genrsa -aes256 -passout pass:caPW -out templateKey.pem 2048
Explanation of the arguments:
|
Argument |
Explanation |
|---|---|
|
genrsa |
genrsa instructs OpenSSL to generate an RSA key. |
|
-aes256 |
Use AES256 to encrypt the key. |
|
-passout pass:password |
The password used to encrypt the private key (in the example: caPW). caPW is just an example and should be replaced by a secure password. |
|
-out filename |
Name of the file containing the private key (in the example: templateKey.pem). |
|
2048 |
The length of the key. |
This command generates one output file: templateKey.pem
This file contains the encrypted private key.
Generate a certificate request
To create a certificate request enter the following command:
openssl req -new -batch -config templateCert.conf
-key templateKey.pem -keyform PEM -passin pass:caPW
-sha256 -outform PEM -out templateCertReq.pem
Explanation of the arguments:
|
Argument |
Explanation |
|---|---|
|
req |
req instructs OpenSSL to generate a certificate request (default) or a certificate. |
|
-batch |
Non interactive mode. |
|
-new |
Create a new request or a new certificate. |
|
-config filename |
The name and the location of the openssl configuration file (in the example: templateCert.conf). |
|
-key filename |
The corresponding private key (in the example: templateKey.pem). |
|
-keyform PEM |
The private key is in PEM format. |
|
-passin pass:password |
Password required to decrypt the private key (in the example: caPW). |
|
-sha256 |
Use the SHA256 algorithm to create the message digest for the signature (recommended). |
|
-outform PEM |
The format of the output file is PEM. |
|
-out filename |
The name of the output file, i.e. the certificate (in the example templateCertReq.pem). |
The command above generates one output file: templateCertReq.pem
This file contains the certificate request.
Request the template certificate
The request has to be sent to the (intermediate) CA. You can sign the certificate request (issue the certificate) with the following command:
openssl ca -batch -config templateCert.conf -days 1826
-md sha256 -in templateCertReq.pem -keyfile caKey.pem
-cert caCert.pem -passin pass:caPW -notext
-out templateCert.pem -outdir .
Explanation of the arguments:
|
Argument |
Explanation |
|---|---|
|
ca |
The ca command is a minimal CA application. It can be used to sign certificate requests and generate CRLs. |
|
-batch |
Non interactive mode. |
|
-config filename |
The name and the location of the openssl configuration file (in the example: templateCert.conf). |
|
-days 1826 |
The period for which the certificate will be valid. |
|
-in filename |
The name of the file containing the certificate request (in the example: templateCertReq.pem). |
|
-cert filename |
The name of the file containing the root certificate (in the example: caCert.pem). |
|
-keyfile filename |
The name of the file containing the key used to sign the certificate request (in the example: caKey.pem). |
|
-passin pass:password |
Password required to decrypt the private key (in the example: caPW). |
|
-md sha256 |
Use the SHA256 algorithm to create the message digest for the signature (recommended). |
|
-notext |
openssl has an option to include human readable, explanatory text in the certificate. But this would create problems later in the process when creating the keystores, therefore do not include any text in the certificate. |
|
-outdir directoryName |
The output directory (in the example the current working directory “.”). |
The command above generates one output file: templateCert.pem
This file contains CAtemplCert. The file should be copied to its final destination, the location must be configured in ca-preferences.xml in the node certificateFactory » certTemplate.
|
The files templateCertReq.pem and templateKey.pem are not needed any more and should be deleted. |
After following the steps described in Chapter 9.2.1 you should find the following files in your working directory:
–templateCert.pem
This file contains CAtemplCert, signed with CAkey.
–caCert.pem
This file contains CAcert, signed withCArootKey.
–caKey.pem
This file contains CAkey.
–rootCert.pem
This file contains the self-signed root certificate CArootCert.
–rootKey.pem
This file contains the encrypted private root key CArootKey.
Some of those files have to be included in keystores. The installation archive mdm-ca-1.11.x.zip contains the (proprietary) java tool ImportKey in the demoCA directory which can be used to create and manage keystores. Please copy the file ImportKey.class to your working directory.
First the intermediate CA certificate and the root certificate have to be merged into one file (create a certificate chain):
cat caCert.pem rootCert.pem > caCertWithChain.pem
Then the key caKey.pem has to be converted to PKCS#8 format and both CAkey and the certificate chain have to be included in a PKCS#12 keystore. This can be accomplished with the tool ImportKey. ImportKey does accept the (unencrypted) key on standard input only, therefore the output of the pkcs8 command has to be piped as follows:
openssl pkcs8 -topk8 -in caKey.pem -passin pass:caPW
-inform PEM -nocrypt -outform DER |
java -cp . ImportKey -alias ca -keystore ca-keystore.jks -storetype JKS -storepass pass:caPW -keypass pass:caPW
-chain caCertWithChain.pem
Explanation of the openssl arguments:
|
Argument |
Explanation |
|---|---|
|
pkcs8 |
The pkcs8 command is used to process private keys in PKCS#8 format. |
|
-topk8 |
Use a traditional format private key as input and write a key in PKCS#8 format key. |
|
-in filename |
The name and the location of the input file (in the example: caKey.pem). |
|
-passin pass:password |
Password required to decrypt the input (in the example: caPW). |
|
-inform PEM |
The input format of the key is PEM. |
|
-nocrypt |
The output (the key) is not encrypted. |
|
-outform DER |
The output format is DER. |
Explanation of the ImportKey arguments:
|
Argument |
Explanation |
|---|---|
|
-alias name |
A keystore can contain multiple entries. The alias identifies the entry and therefore has to be unique in the keystore. Aliases are case-insensitive. |
|
-keystore filename |
The file containing the keystore (in the example: ca-keystore.jks). |
|
-storetype JKS |
Use JKS as format for the keystore. |
|
-storepass pass:password |
Password required to decrypt the contents of the keystore (in the example: caPW). |
|
-keypass pass:password |
Additional password required to decrypt the private key in the keystore. |
|
-chain filename |
The certificate chain including the root certificate. |
The command above generates one output file: ca-keystore.jks
This is the keystore for your CA containing the certificate chain and the private CA key. Please copy the keystore to its final destination.
–The filename including the absolute or relative path of this keystore has to be configured in the ca-preferences.xml file in the node certificateFactory » keyStore.
–The password to access the keystore (in the example caPW) has to be configured in the ca-preferences.xml file in the node certificateFactory » keyStorePassword.
–The format of this keystore (Java KeyStore – JKS) has to be configured in the ca-preferences.xml file in the node certificateFactory » keyStoreType.
–The password to access the private key (in the example caPW) has to be configured in the ca-preferences.xml file in the node certificateFactory » keyPassword.
–The alias (ca) of the key has to be configured in the ca-preferences.xml file in the node certificateFactory » keyAlias.

9.2.3Requirements for certificates
For proper function of the VPN certificates also with future versions of the mGuard firmware and the mdm, the certificates have to satisfy the following requirements:
1.The private key should have a length of at least 1024 bits. Phoenix Contact recommends a key length of 2048 bits for long term security.
2.Any certificate must conform to RFC 3280.
3.Any CA certificate must contain a Basic Constraints extension marked as critical and with the boolean cA field set to true.
4.Phoenix Contact strongly recommends to include the pathLenConstraint field in any CA certificate's Basic Constraints extension. It must be set to one less than the number of descendant CA certificates. So for a typical scenario where a certification chain is made up of one root CA certificate, a single intermediate CA certificate and an end entity certificate (VPN certificate in this case), the pathLenConstraint must be one (1) for the root CA certificate and zero for the intermediate CA certificate.
5.The template VPN certificate must have a Basic Constraints extension marked as critical with the boolean cA field set to false and without a pathLenConstraint field.
6.Any CA certificate must contain a Key Usage extension marked as critical with the bit keyCertSign set. It is recommended to have the bit cRLSign set as well.
7.The template VPN certificate does not need to contain any Key Usage extension.
8.Any intermediate CA certificate must contain one or both of the extensions CRL Distribution Points and Authority Information Access, if it is planned to distribute revocation information online with a future release of the mdm and the mGuard firmware. The extensions must be marked as non-critical. The former extension is required if it is intended to use Certificate Revocation Lists (CRLs) in the future. The latter extension is required if it is intended to use the Online Certificate Status Protocol (OCSP, see RFC 2560) in the future. Any of the extensions must contain HTTP URLs only.
9.The template VPN certificate should contain one or both of the extensions CRL Distribution Points and Authority Information Access, described above, if it is planned to distribute revocation information online in the future. Alternatively, the mdm server can be instructed to include them within the certification request sent to the mdm CA. The latter is more flexible, because this way the location of the revocation information (CRL) respectively information service (OCSP) can be set for groups of devices or even for individual devices.
Please note: If the template VPN certificate already includes any of the extension and the mdm is instructed to include it within the certification request as well, the extension from the request overrides the one found within the template. The issued certificate will contain the extension copied from the request.
10.The keystore containing the certificates has to contain the complete certificate chain up to and including the root certificate.


